Account Settings
To Manage Accounts on Qoo10,
- Go to the Magento 2 admin panel.
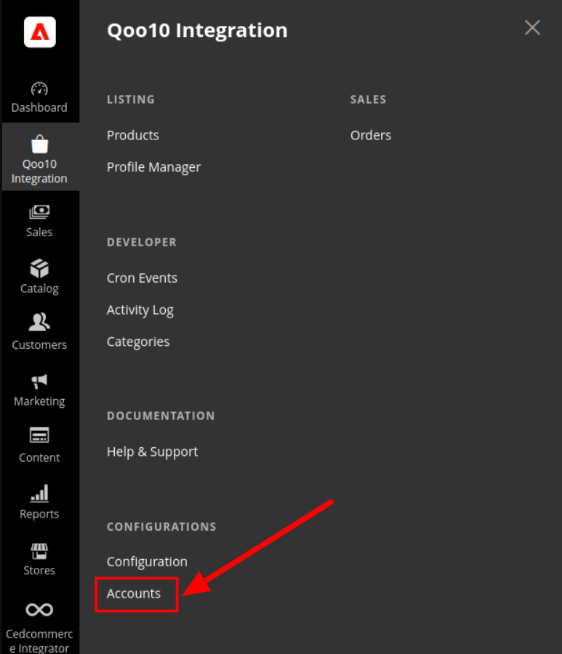
- On the left navigation bar, click Qoo10 Integration.
- When the menu appears, click Accounts.

- On clicking it, you will be navigated to the page as shown below,

- To add a new account, click on the Add Account button on the top right corner.

- You’ll be redirected on a new accounts page:

- In the Account Information tab, enter the following:
- Enter the Account Code in the first section NOTE: The account code is for your own recognition
- You can choose the current status of the account under the section Account Status.
- In the Account Store section choose the view of the store.
- Once all the actions have been taken so far, click on the Save button on the top right of the page.
- Now click on Shop Information Tab, and enter the following details:

- In Country, select the Qoo10 country.
- In Language, select the language you want to choose.
- In Shop Name, enter the name of your shop.
- In User Id, enter your user id of the qoo10 shop User Id.
- In Shop Password, enter the password you want for your shop.
- In the Signature Key option, enter the key.
- In the Token option, it gets filled automatically once you authorize your account.
- Once all the actions have been taken so far, click on the Save button on the top right of the page.
- You are redirected back to the accounts page.
To Validate the Account:
- Click on the authorize button associated with the account you wish to validate as shown in the figure below:

- You will be redirected to your Qoo10 Seller panel and then after verification redirected back to your Magento panel.
- The Valid/Invalid section of your account shows a green box named valid.

To Edit Account:
- Click on the edit button associated with the account you wish to make changes in:

- The edit account page opens up where you can make the desired changes as you wish:

- Click on the Save button and account changes are finalized.
Related Articles
View Qoo10 Orders
To View Qoo10 Orders, Go to the Magento 2 Store Admin panel. On the left navigation bar, click the Qoo10 Integration menu. The menu appears as shown in the following figure: Click Orders. The Qoo10 Order page appears as shown in the following figure: ...Fetch New Qoo10 Orders
To Fetch New Orders, Go to the Magento 2 Store Admin panel. On the left navigation bar, click the Qoo10 Integration menu. The menu appears as shown in the following figure: Click Orders. The Qoo10 Order page appears as shown in the following figure: ...Configuration
Once the extension is successfully installed in the Magento 2 store, the Qoo10 INTEGRATION menu appears on the left navigation bar of the Admin Panel. The merchant has to first create a seller account on the Qoo10 seller panel. To Set Up the ...Add New Profile
To Add a New Profile, Go to the Magento Store Admin panel. On the left navigation bar, click the Qoo10 INTEGRATION menu. The menu appears as shown in the following figure: Click Profile Manager. The Manage Profile page appears as shown in the ...