Allegro Configuration Settings
After obtaining the API credentials from the Allegro Seller account, the Magento store owner has to paste them in the respective fields displayed on the Allegro Configuration page of the admin panel.
To set up the configuration settings in the Magento Admin panel 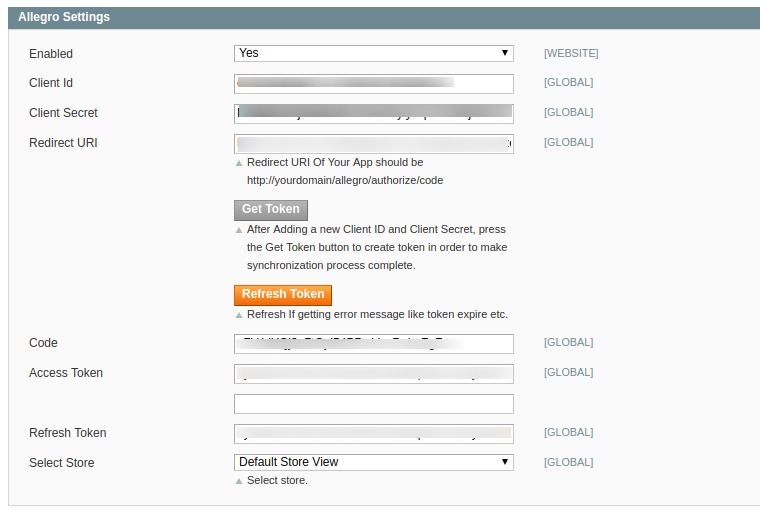
- Go to the Magento Admin panel.
- On the top navigation bar, point to the Allegro menu.
- The menu appears as shown in the following figure:
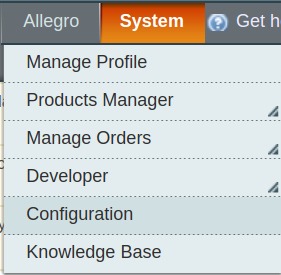
- Click Configuration.
- The Allegro Configuration page appears as shown in the following figure:

- Click the Allegro Settings tab.
- The tab is expanded and the relevant field appears under the Allegro Settings section.

- Under AllegroSettings, do the following steps:
- In the Enabled list, select Yes to enable the extension features.
- Enter the Client Id and Client Secret Key which can be retrieved from your Allegro Seller panel dashboard.
- In Redirect URL, enter the Url of your store.
- Now Click on Get Token to create token in order to make the synchronization process complete.
- The field below are automatically filled.
- The token gets expired within the span of 2 hours, so click on Refresh Token in that case.
- In Select store, select the default view of your store.
- Click the Allegro Pickup Location Settings tab.
- The tab is expanded and the relevant fields appear under the Allegro Pickup Location Settings section as shown in the following figure:

- In the section of Allegro Pickup Location Settings,
- Enter your Country Code in the section.
- In Province, select the province on the basis of your selected country.
- Then enter the City.
- In Post Code, enter the postal code of the city.
- Now, Click the Allegro Shipment Settings tab.
- On clicking, the tab is expanded and the relevant fields appear under the Allegro Shipment Settings section:
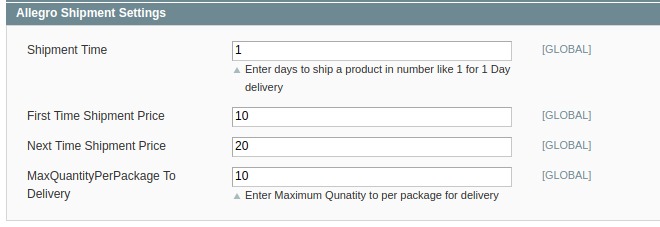
- Enter the Shipment Time in how many days you want the delivery to be done.
- In the First Time Shipment Price, enter the price of shipping for the first time.
- Now in Next Time Shipment Price, enter the amount of price for the next time.
- In MaxQuantityPerPackage To Delivery, enter the maximum quantity for the package delivery.
- Now click on Order Settings, and the section expands as shown:
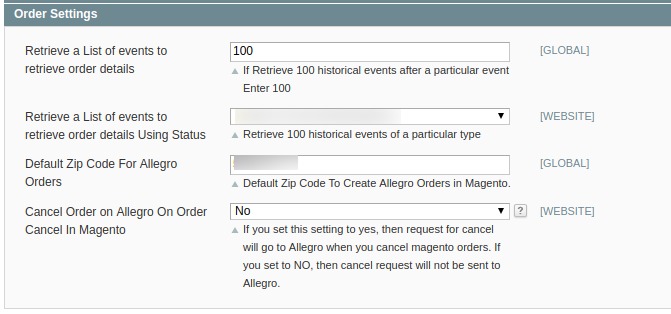
- In the Retrieve a List of events to retrieve order details, select the frequency of previous orders you want to keep in history.
- In Retrieve a List of events to retrieve order details Using Status, choose the status between the bought, filled in and ready for processing.
- In the Default Zip Code For Allegro Orders, enter the default ZIP code for receved orders.
- Choose yes or no if you want to Cancel Order on Allegro On Order Cancel In Magento.
- Click on the Allegro Product Price Settings and the section expands as:

- In the Allegro Product Price select the required option. This is to set a different price for all the products as shown in the following figure:
- Increase by Fixed Price: If selected, then the Modify by Fix Price field appears.
- Increase by Fixed Percentage: If selected, then the Modify by Percentage Price field appears. Enter the numeric value to increase the price of the Allegro product price by the entered value % of Magento price For Example: Magento price + 5% of Magento price. Magento Price = 100 Select Increase By Fixed Percentage option Modify by Percentage Price = 5 100 + 5% of 100 = 100 + 5 = 105 Thus, Allegro Product Price = 105
- Decrease by Fixed Price: If selected, then the Modify by Fix Price field appears.
- Decrease by Fixed Percentage: If selected, then the Modify by Percentage Price field appears. Enter the numeric value to decrease the price of the Allegro product price by the entered value % of Magento price For Example: Magento price – 5% of Magento price. Magento Price = 100 Select Decrease By Fixed Percentage option Modify by Percentage Price = 5 100 – 5% of 100 = 100 – 5 = 95 Thus, Allegro Product Price = 95
- You can Round Off Final Product Price by selecting Yes.
- Click on Developer Settings.
- The section expands as shown below:

- In the Debug option enable or disable to get create a log of all the activites performed. This is a nice way of rectifying the errors.
- Choose the Product Chunk Size by entering the value in the next column.
- Now move to the Cron Settings.
- Click and the section expands as shown below:
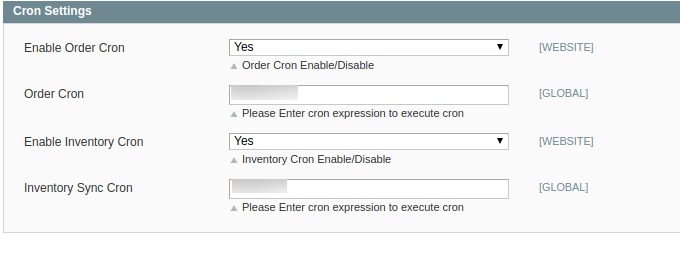
- Select if you want to enable/disable the cron for orders/ inventory sync and enter the desired values for the respective cron’s execution.
- Click on Save Config to save the entered details.
Related Articles
Allegro Orders
Using the Allegro Integration for Magento Extension by us, you may fetch and view the Allergo orders. To view the Allegro Orders, Go to your Magento admin panel. On the top navigation bar, place cursor on Allegro. When the menu appears, place cursor ...Allegro Cron Logs
To view the Allegro Crons, Go to your Magento admin panel. On the top navigation bar, place cursor on Allegro. When the menu appears, place cursor on Developer. When it further expands, click on Allegro Crons. On clicking it, you will be navigated to ...Allegro Knowledge base
For knowledge base which includes help and support from CedCommerce, Go to your Magento admin panel. On the top navigation bar, place cursor on Allegro. When the menu appears, click on Knowledge Base. Under the CedCommerce Support: Contact us via ...Manage Allegro Profiles
Note: Admin can create a new profile and assign the required products to the profile. While creating and editing the profile, admin can map the Magento attributes to the Allegro attributes. These attributes are applicable to all the products that are ...Allegro Activity Logs
To view the Allegro Activity Logs, Go to your Magento admin panel. On the top navigation bar, place cursor on Allegro. When the menu appears, place the cursor on Developer. When it further expands, click on Activity Logs. On clicking it, you will be ...