Amazon Affiliate Configuration Settings
Amazon Affiliate Configuration Settings
After retrieving the Amazon Affiliate API credentials, the store owner can use them while setting up the configurations through the Admin panel.
To set up the Amazon Affiliate Configuration
- Go to the Admin panel.
- On the left navigation bar, click the AMAZON AFFILIATE menu.
The menu appears as shown in the following figure: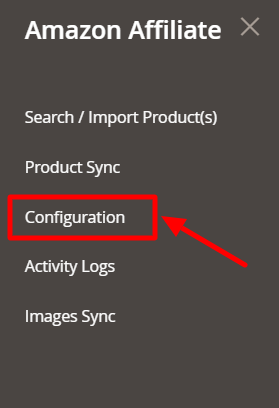
- Click Configuration.
The Configuration page appears as shown in the following figure: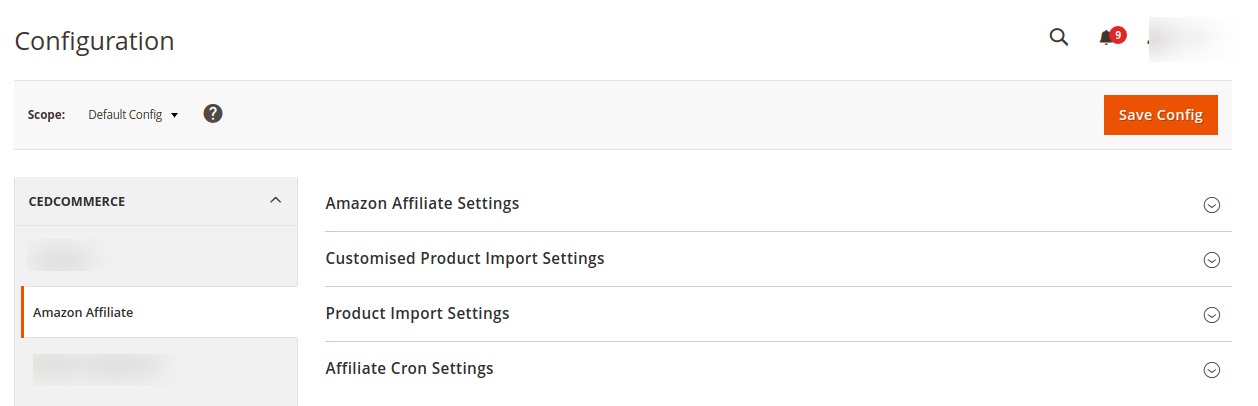
- In the right panel, click the Amazon Affiliate Settings tab.
The tab is expanded, and the section appears as shown in the following figure:
- Under Amazon Affiliate Settings, do the following:
- In the Amazon Affiliate Api Key box, paste the Access Key ID copied from the Amazon Affiliate account.
- In the Amazon Affiliate Tag Key box, paste the Store ID copied from the Amazon Affiliate account.
- In the Amazon Affiliate Secret Key box, paste the Secret Access Key copied from the Amazon Affiliate account.
- In Endpoint URL, enter the URL.
- Now Click on Customised Product Import Settings, and the tab is expanded as:
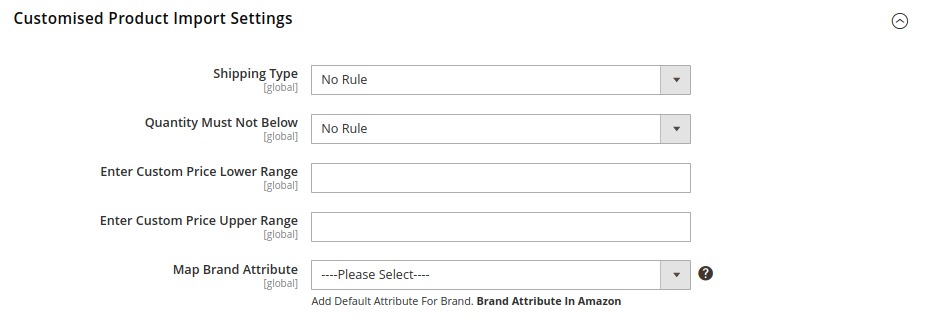
- Under Customised Product Import Settings, do the following steps:
- In Shipping Type, select the type of shipping from the menu.
- In Quantity Must Not Below, select the quantity.
- In the Enter Custom Price Lower Range, enter the price for the lower range products.
- In the Enter Custom Price Upper Range, enter the custom price of the upper range products.
- In Map Brand Attribute, add the brand attributes in Amazon.
- Scroll down to the Product Import Settings tab, and then click the tab.
The tab is expanded, and the section appears as shown in the following figure: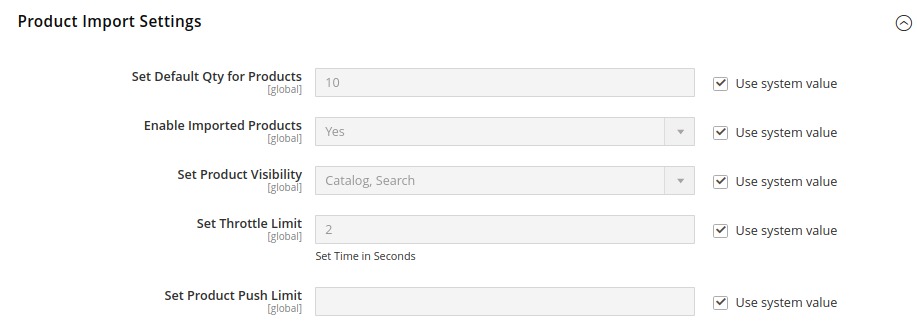
- Under Product Import Settings, do the following steps:
- In the Set Default Qty for Products box, enter the required number of products.
- In the Enable Imported Products list, select the Yes option to enable the imported products.
- In the Set Product Visibility list, select the required option to set the area where the product is visible.
- In the Set Throttle Limit box, enter the time in seconds.
Tip: To change the value, clear the Use System value check box. - In Set Product Push Limit, either enter the limit or select the system value.
- Now scroll down and click on Affiliate Cron Settings; the tab is expanded as:
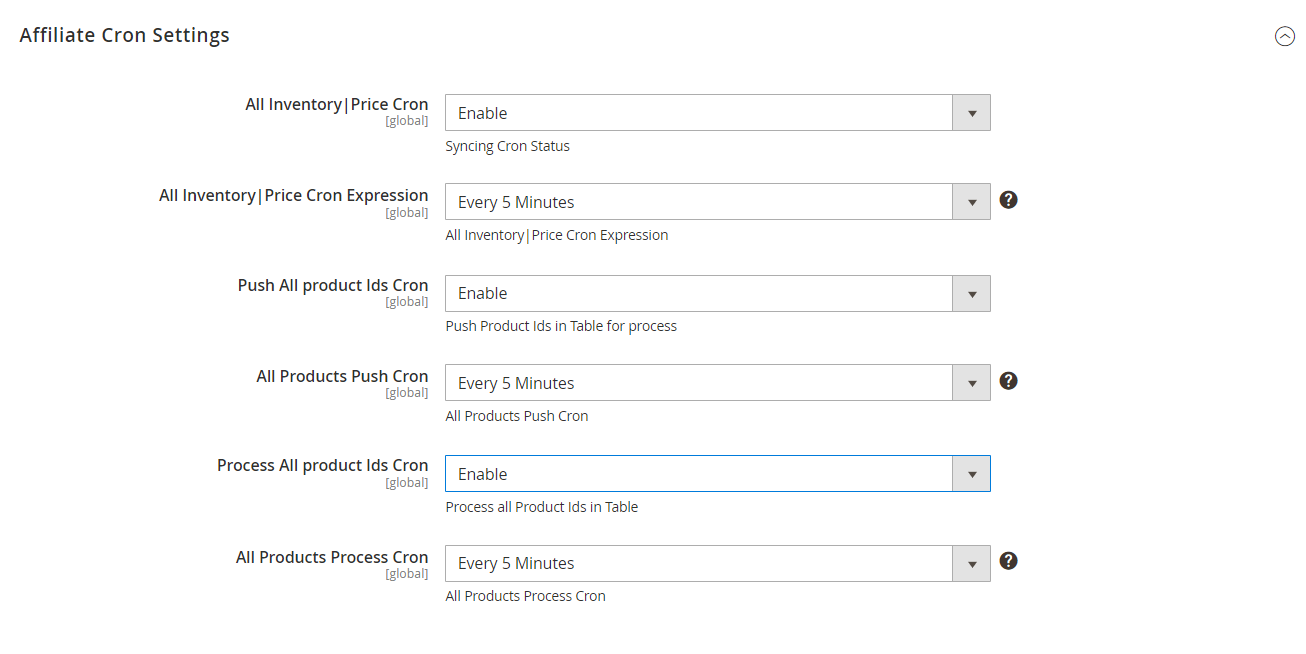
- Under Affiliate Cron Settings, do the following steps:
- In All Inventory/Price Cron, select Enable to sync the inventory and price through crons.
- In All Inventory/Price Cron Expression, select the duration at which you want the inventory and price cron to run.
- In Push All Product Ids Cron, select Enable to push the products in the table.
- In All Product Push Cron, select the duration you want to run the product cron.
- In Process All Product Ids Cron, select Enable to process the product ids.
- In All Products Process Cron, select the duration at which you want products process cron to run.
- Click the Save Config button.
The Configuration settings are saved and a success message appears.
Related Articles
Retrieve Amazon Product Affiliate API Access Key and Secret Key
Retrieve Amazon Product Affiliate API Access Key and Secret Key Once the Amazon Affiliate Program for Magento 2 extension is successfully installed on the Merchant’s store, Amazon Affiliate tab appears on the left navigation bar of the Magento Admin ...Amazon Affiliate Product Synchronization
Amazon Affiliate Product Synchronization This section covers the process of Amazon Affiliate Product Synchronization. To synchronize Amazon Affiliate products Go to the Admin panel. On the left navigation bar, click the AMAZON AFFILIATE menu. The ...Images Synchronisation
Images Synchronisation To synchronize Amazon Affiliate product images Go to the Admin panel. On the left navigation bar, click the AMAZON AFFILIATE menu. The menu appears as shown in the following figure: Click on Images Sync. The Amazon Affiliate ...Import Products Through Amazon Product Link
Import Products Through Amazon Product Link To import the products through Amazon Product link Go to the Magento 2 Admin panel. On the left navigation bar, click the AMAZON AFFILIATE menu. The menu appears as shown in the following figure: Click ...Activity Logs
Activity Logs To View Amazon Affiliate Activity Logs Go to the Admin panel. On the left navigation bar, click the AMAZON AFFILIATE menu. The menu appears as shown in the following figure: Click on Activity Logs. The Activity Logs page appears as ...