API Details
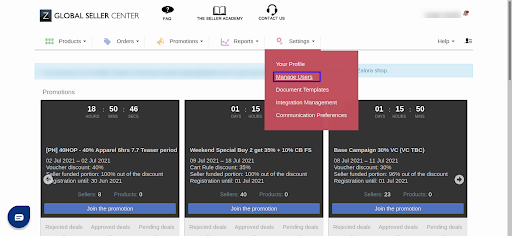
Go to the Zalora seller center and sign in by entering the email address and password.

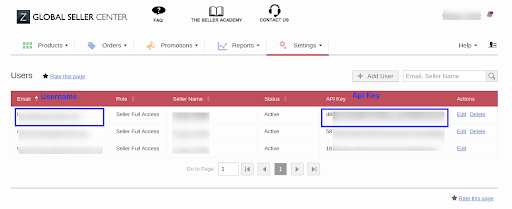
Click on the setting section, choose to manage users, and then click on add user. Get the API details as shown in the screenshot and manage users from the settings dropdown.


Once the account is created, select on the Configure tab as shown below.

Zalora Account Details
The account details section will reflect all the details you have mentioned during the process of adding your account, and you can also update the account status to Active/Inactive.

Schedulers
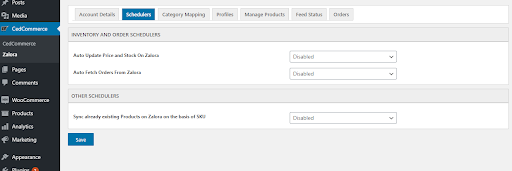
Schedulers sync the product data on your Zalora store from your WooCommerce store automatically.

You can set the schedulers for auto-update price and stock on Zalora, auto fetch orders from Zalora, and sync already existing products on Zalora based on SKU.
- Auto Update Price and Stock On Zalora –This feature updates the price and stock information of the products from the WooCommerce store to the Zalora marketplace regularly at the selected time interval.
- Auto Fetch Orders from Zalora –With the plugin’s help, you can pull all the Zalora orders and create them in the WooCommerce store, thereby making the stock level even once the order is created.
- Sync already existing Products based on SKU –This feature will sync all the existing products on Zalora and WooCommerce both with the help of SKU.
The scheduler helps in the automatic syncing of your data and keeps the store up-to-date.
Save and move to category mapping.
Related Articles
How to Register as a Seller on Zalora?
To register on Zalora, follow the given steps- To get started with a seller account on the Zalora marketplace, click here Choose the location where you want to start selling. Scroll down, and you will find the About Us section on Zalora.com. Click on ...Get Started
To get started with Zalora Integration for WooCommerce, go to CedCommerce and click on Zalora, as shown in the screenshot. A page will open as shown; click on Add account. Enter the Shop username, Zalora username, Zalora API key, and select the ...Category Mapping
This feature lets you map WooCommerce store categories to the Zalora category. Select the categories you want to map, and all the products in the particular WooCommerce category will get listed under the mapped Zalora category. For mapping, the ...Manage Products
Admin can view all the product details such as Product Name, Product Type, Product Price, Product SKU, Product Stock, Profile Assigned, and category name. Admin can apply the filters by Product Status, Product Category, and Product Type. Also, the ...Overview
Zalora, one of the leading platforms for online shopping- features numerous local and international brands. The marketplace allows you to create an attractive storefront while reaching out to a large customer base. The most lucrative aspect of the ...