ClaroShop Category Settings
To Fetch Category
- Go to the Prestashop Admin panel.
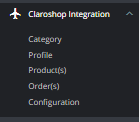
- In the left navigation panel, place cursor on Claroshop Integration and the section expands as:

- Click on Category
The page appears as shown in figure:
- In the Category section, you can see all fetched categories from ClaroShop and you can fetch by clicking on the ‘Fetch Category’ button created on the top right corner.
Related Articles
Claroshop Product Settings
To manage products Go to the Prestashop Admin panel. In the left navigation panel, place cursor on Claroshop Integration and the section expands as: Click on Products The page appears as shown in figure: In the Product settings, do the following ...Claroshop Profile Settings
To manage Profiles Go to the Prestashop Admin panel. In the left navigation panel, place cursor on Claroshop Integration and the section expands as: Click on Profiles The page appears as shown in the figure: Now click on Add New Profile. You will be ...ClaroShop Configuration Settings
Once the module gets installed, you get navigated to the Configuration page. Go to the Prestashop Admin panel. In the left navigation panel, place cursor on Claroshop Integration and the section expands as: Click on Configuration The page appears as ...Claroshop Orders Settings
To manage Orders Go to the Prestashop Admin panel. In the left navigation panel, place cursor on Claroshop Integration and the section expands as: Click on Orders. The page appears as shown in the figure: In the Order section, do the following steps: ...Claroshop Extension Installation
To install the extension: Go to the Prestashop Admin panel. On the left navigation bar, point cursor to the Modules and Services. The menu appears as shown in the following figure: Now click the Modules Manager menu, and you will come across a page ...