Configuration Settings
To set up the configuration settings,
- Go to the Magento Admin Panel.
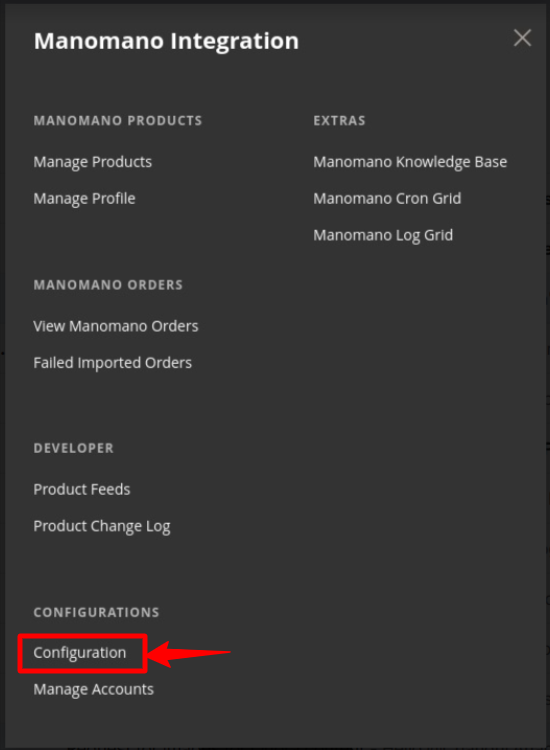
- On the left navigation bar, click on the ManoMano Integration menu.
The menu appears as shown below:
- Click on Configuration.
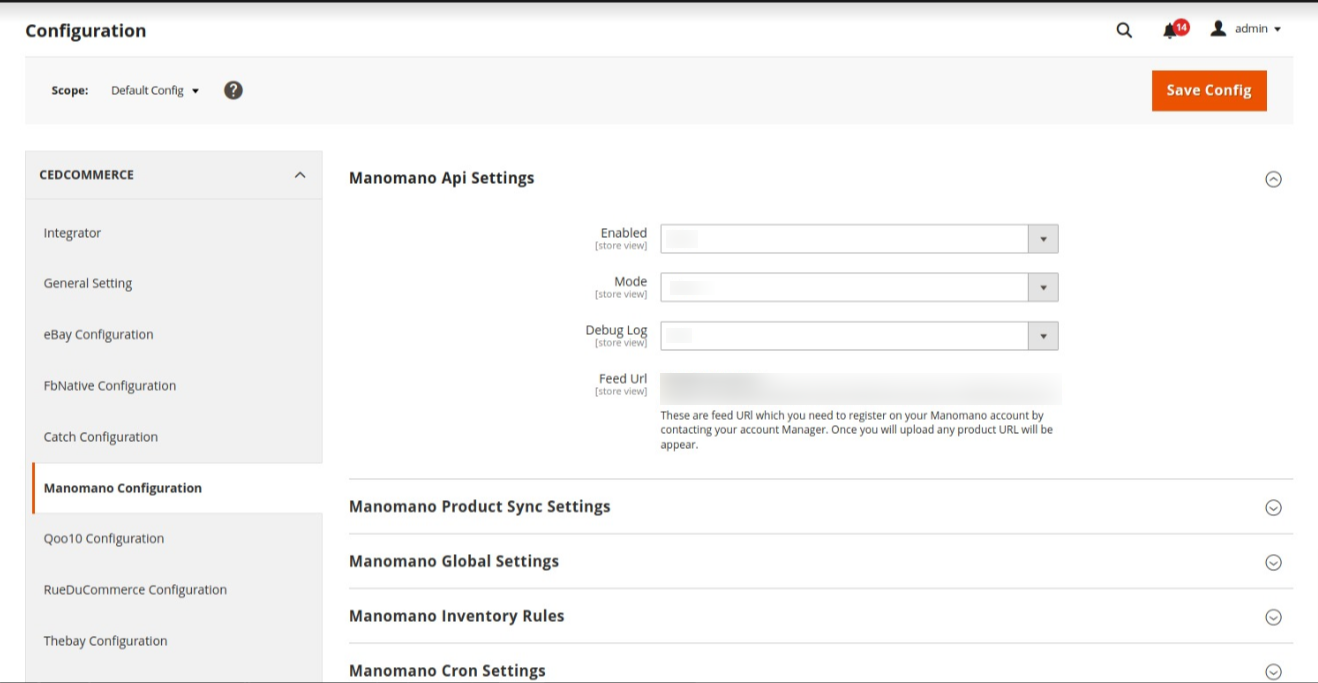
The Configuration Settings page appears as shown below:
- In the right panel, click on Manamano API Settings. The section is expanded as shown below:

- Under ManoMano API Settings, do the following steps:
- In Enabled, select the Yes option to enable the extension configuration settings.
- In the Debug Log, select Yes if you want the logs to be created. This setting is for the developer’s use only.
- Feed URL is which you need to register on your Manomano account by contacting your Account Manager. Once you will upload any product, the URL will appear.
- Scroll down and click on ManoMano Product Sync Settings, the section is expanded as shown below:

- Under ManoMano Product Sync Settings, do the following steps:
- In Select Store, select the store view for the products.
- In Use Calculated Shipping, select the Yes option to ignore all the shipping time mapping of the profile while product upload.
- In Shipping Time, enter Shipping Time if Quantity is greater than zero.
- In the next Shipping Time, enter Shipping Time if Quantity is equal to or less than zero.
- In Quantity, enter the quantity for the products which you want if Magento quantity is equal to or less than zero.
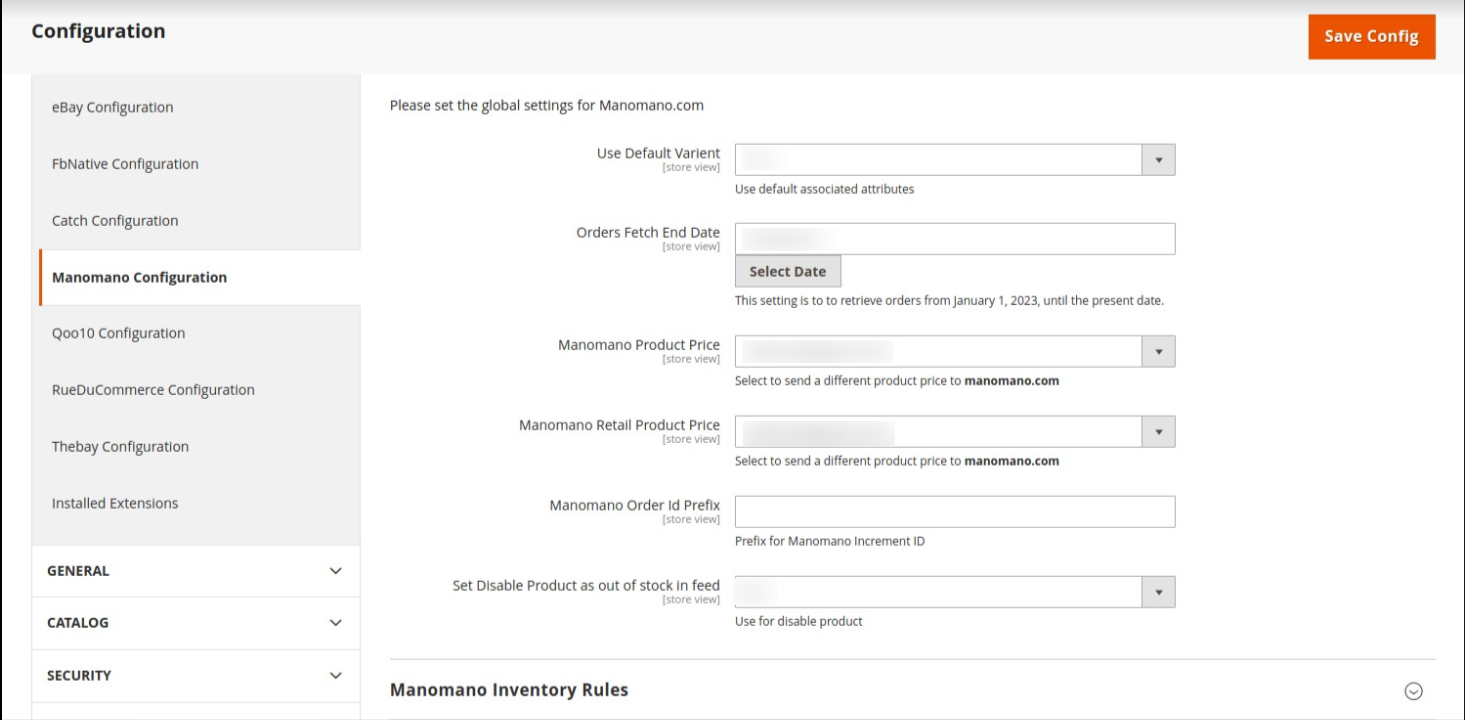
- Now scroll down and click on ManoMano Global Settings. The section is expanded as shown below:

- Under ManoMano Global Settings, do the following steps:
- In Use Default Variant, select Yes to use the default associated attributes.
- In Orders Fetch End Date, select the date until which you want to fetch the orders. This setting is to fetch orders till this date from 15 days previous orders.
- In Manomano Product Price, select one of the following options:
- Increase by Fixed Price: If selected, then the Modify by Fix Price field appears.
- Increase by Fixed Percentage: If selected, then the Modify by Percentage Price field appears.
- Enter the numeric value to increase the price of the Manomano, product price by the entered value % of Magento price
For Example,
Magento price + 5% of Magento price.
Magento Price = 100
Select Increase By Fixed Percentage option
Enter Percentage = 5
100 + 5% of 100 = 100 + 5 = 105
Thus, Manomano Product Price = 105 - Decrease by Fixed Price: If selected, then the Modify by Fix Price field appears.
- Decrease by Fixed Percentage: If selected, then the Modify by Percentage Price field appears.
Enter the numeric value to decrease the price of the Manomano product price by the entered value % of Magento price.
For Example,
Magento price – 5% of Magento price.
Magento Price = 100
Select Decrease By Fixed Percentage option
Enter Percentage = 5
100 – 5% of 100 = 100 – 5 = 95
Thus, Manomano Product Price = 95
- In Manomano Retail Product Price, select the desired price for the products.
- In ManoMano Order Id Prefix, enter the required prefix value for the order.
For instance, enter MN- for MN-10001. - In Set Disable Product as out of stock in feed, select Yes if you want the out of stock products to be disabled.
- Scroll down and click on ManoMano Inventory Rules. The section is expanded as shown below:

- Under ManoMano Inventory Rules do the following steps:
- In Set Inventory on Basis of Threshold, select Enable to set the value of inventory.
- In Inventory Threshold Value, enter the inventory quantity on which lesser and greater conditions can control.
- In Send Inventory for Lesser Than Threshold Case, enter quantity to Manomano for those products, whose inventory is LESSER than the inventory threshold.
- In Send Inventory for Greater Than Threshold Case, enter quantity to Manomano for those products, whose inventory is GREATER than the inventory threshold.
- In Use MSI, select Yes if you want to enable the MSI.
- In MSI Source Code, enter the source code that you want to use for ManoMano.
- In Use Salable Quantity, select Yes if want the sales quantity to be available. After selecting Yes it will expand as shown below:

- In MSI Stock Name, enter the name for the stock that you want for the ManoMano.
- Now scroll down and click on Manomano Cron Settings. The section is expanded as shown below:

- Under Manomano Cron Settings, do the following steps:
- In Manomano Order Cron, select Enable to fetch the orders automatically through cron at regular intervals of time.
- In Manomano Last Order Cron, select Enable if you want to fetch the last order through cron.
- In Manomano Inventory Cron, select Enable to update the inventory automatically at regular intervals of time through cron.
- In Upload/Update Cron, select Enable to automatically upload/update all the products assigned to the profile.
- In Manomano Shipment Cron, select Enable to automatically ship the acknowledged orders.
- Scroll down and click on Order Setting. The section is expanded as shown below:

- Under Order Setting, do the following steps:
- In Auto Acknowledge Manomano Order, select Yes if you want to automatically acknowledge the created orders.
- In Include Disabled Product in Order, select Yes to include the disabled Manomano products as order items.
- In Include Out of Stock Product in Order, select Yes to include the out of stock Manomano products as the order items.
- In Customer Group, select the customer group in which you want to assign all the ManoMano Customers which will be created by the module.
- In Alternate SKU Attribute, enter the alternate SKU. If ManoMano SKU doesn’t match with your Magento SKU, then you can map an alternate SKU where the ManoMano attribute exists in Magento.
- In Create Order for non existing Product (if Not Exist), select Yes if you want to create a new order if it does not exists in the Magento store.
- In Carrier Mapping, Map the Shipping Carrier for Shipment. To place the tracking number in the tracking URL, use ##tracking_number##. Then this will replace with the actual tracking number of the Magento order shipment.
- Click on the Save Config button. The configuration settings will be saved.
Related Articles
Manage ManoMano Accounts
To manage accounts, The “manage Manomano accounts” section allows sellers to manage their accounts. This includes setting up a new account, editing existing accounts, and viewing the list of accounts created. Go to the Magento Admin Panel. On the ...View ManoMano Orders
To view/fetch the created orders, The “View Order” section displays a list of orders that have been successfully retrieved from Magento 2. This feature of the integration extension enables you to manage all the orders available in the Magento 2 store ...ManoMano Extension Installation
To install the extension, Upload and Extract the Manomano package and Integrator file inside the <magento-root>/app/code/Ced/ directory and run the bolow command from magento root. php bin/magento setup:upgrade php bin/magento setup:di:compile php ...View Activity Logs
To view Manomano Log Details The “view activity log” section displays a list of activities that were not successfully retrieved from Magneto. There are several reasons, which may lead to such failures including cron failures, review activity and ...Cron Logs
To view the ManoMano Cron Details: In the “cron details” section, the cron job is scheduled for retrieving orders, updating inventory, offers, and shipments in the given time. This section provides information about the creation time, scheduled time, ...