Connect Magento Store with the Connector0
- Go to Connector (on top of the collapsible menu on the left side of the page) and then click on it.
- Now, click on Miravia Connector.
- Merchants get a token type to establish a connection between the app and Magento store.
- Integration Token: It is more secure and reliable; more importantly, it doesn’t expire.
- Admin Token: Admin token is not valid for a long time; it expires in a few hours. Thus creating trouble for merchants.
- Enter the required information for each option after selecting the preferred option for the Token Type.
If Integration Token Is Selected
To establish a connection between your Magento store and CedCommerce App, it is suggested to use the Integration token as it is more reliable and safe. Enter the following details to proceed:
- Email: Enter the email id that is associated with your Magento store.
- Store ID: Select the respective store ID to connect with our app.
Now, click on Connect, available in the top right corner of your screen.
If Admin Token Is Selected
You can also opt for an Admin Token to establish a connection between your Magento store and the CedCommerce App; you need to enter the given details.
- Username: Enter the username for your Magento store.
- Password: Enter the login password for your Magento store.
- Store ID: Select the respective store ID to connect with our app.
Once done, click on Connect, available in the top right corner of your screen.
Grant Sales and Payment Permission on Magento

This field is not mandatory, but for smooth business flow, it's always preferable to set everything.
To start managing sales and payments through the Miravia connector, you need to enable permission for each. The process to complete the steps has been listed below:
Grant Delivery Permissions on Magento
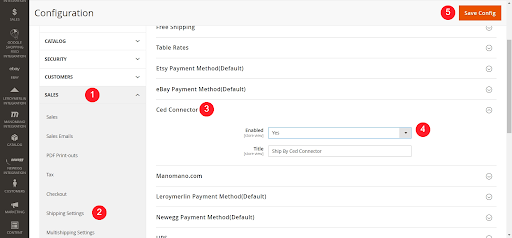
- Firstly, go to your Magento account and navigate to the store section.
- Secondly, click on the configuration available under the settings.
- Click on the “Sales tab” to manage delivery permission.
- Once on the sales page, select the Shipping Method, and go to the tab – Ced Connector; enable it by selecting Yes and save. By default, it is set to No.
Store –> Configuration –> Sales –> Delivery method –> Enable Ced Connector
Grant Payment Permissions on Magento
- Firstly, go to your Magento account and navigate to the store section.
- Secondly, click on the configuration available under the settings.
- Click on the “Sales tab” to manage payment permission.
- Once on the sales page, select the Payment Method, and go to the tab – Ced Connector; enable it by selecting Yes and save. By default, it is set to No.
Store –> Configuration –> Sales –> Payment method –> Enable Ced Connector
How to check the connection Status of Magento?
To check whether or not the connector is connected to the Magento store, you need to visit the Miravia Connection Information page.
The Miravia Connector Information page gives you an overview of the connection status and also provides you with an option to reconnect the store.
You can find three tabs at the top left corner of the page and perform multiple actions accordingly.
ReConnect App: This option allows you to connect and reconnect your Magento store with the connector.
Go To Dashboard: This option helps you navigate through the connector solution and helps you perform many other actions in the connector.
Disconnect App: With this option, you can disconnect the connector from your Magento store. There won’t be any integration between your Magento store and Miravia.
Related Articles
Connect Miravia Merchant Account to Connector
The next step after connecting your Magento store to the Miravia connector is connecting your Miravia account with the connector platform. Once you have successfully connected your Magento store to the Miravia connector, the next step is to establish ...Onboarding
Once you’ve installed the connector, you can get started and onboard to start selling on Miravia from your Magento store. The onboarding includes: Connecting Magento Store with the connector Connecting Miravia Marketplace Account with the connectorDefault Configuration Section
Once the profile data is saved successfully, proceed with the default configuration. Title Optimization: Set product title and optimize it as per SEO for better visibility. Add relevant keyword to get it easily identified by customers. Custom Price ...General Setting Section
Firstly, go to the “Configuration” section. Under the general setting, you can modify and update the price rule, and auto-syncing option and also set the threshold inventory limit. Title Optimization: Set rules for the product titles. You can choose ...Product Overview
The product section of the connector provides you with every bit of detail you need to sync, list, and manage your products. To amend or update product settings, firstly go to the ‘Product Section.’ Product Status At the top bar, you can view ...