Event : General Configuration
After the successful installation of the module, the admin needs to configure the Event Module and will navigate to Store < Configuration < Booking < Booking System
This Section Helps The Admin To Enable The Extension Features To His Store

1. Enable Booking System: Select YES or NO, to Enable the booking System Feature, as Event Booking Feature to your website.
2. MAP API Key: Admin needs to enter the Google Map API key, to pin the event location on the map.
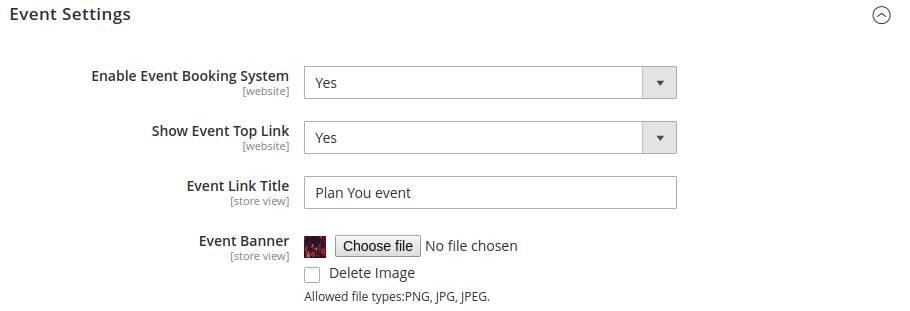
Now The Admin Need To Configure, Event Settings
Here admin can easily manage the setting to add events and group events to the calendar, for promoting any sale, offers or events to the customers.

1. Enable Event Booking System: Here Admin needs to select YES or NO to enable or disable the event booking feature to the store.
2. Show Event Top Link: This shows the Event Link option on the top header of the store if admin enables the option.
3. Event Link Title: This is a Title that appears at the top link of the store.
4. Event Banner: Here the admin can update the image that appears in the banner section of the Event Link Page.

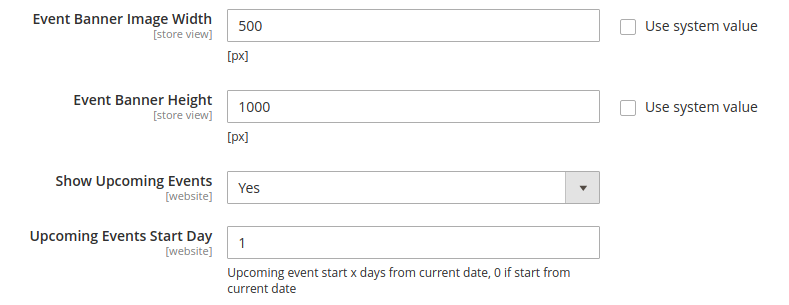
5. Event Banner Image Width / Height: Here the admin can set the Banner image height and width, that appear in an Event landing page.
6. Show Upcoming Events: If set “Yes” this feature will allow a customer to search the events that are nearly to come up after the day (Number) entered.
Related Articles
Event Management Page
On the webstore customer can see all the events on the event page. Plan your Event Here customer can see all the event that is to further to arrive, so he can directly check from here and purchase the event ticket. Filter By Location: Here the ...Event Product : Frontend Section
Event Date and Time can be as selected by the customer via dropdown as set by admin. The customer can select the Date and Ticket type, then he can purchase the event ticket and then can checkout to purchase the event ticket. The event ticket with the ...Creating a New Event
The extension adds a new product type section, which has all the Event Type Products that can be booked by the customers, from the system, so the admin needs to navigate to Booking < Products. Clicking on the Event Booking Product type customer can ...Adding Event Facilities
There is Various facility that can be provided in the event to occur, therefore admin can various custom facilities created for his store. These facilities can be selected as required at the time of creating the event. Example : Dinner / Lunch, ...Admin : Event Order Management
To Navigate to the Event ticket purchase, an admin needs to navigate to Booking < Order. now moving to the panel admin need to Invoice the order in the same way, to make the order as complete.