Local Delivery on Amazon
Local Delivery on Amazon
Local Delivery

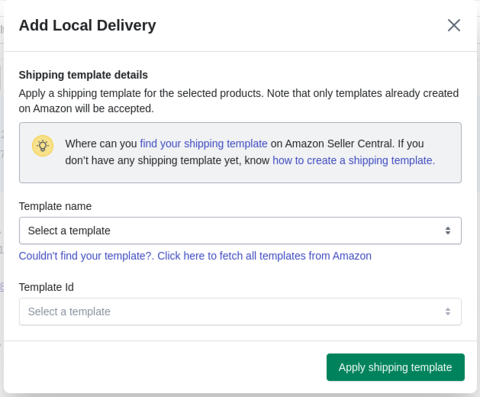
Amazon delivers products to customers within a localized or nearby area. It often includes same-day or one-day delivery options. Set a shipping template for local delivery to easily fulfill these orders in a timely manner.

Local Delivery
Template
Access all local delivery templates here, allowing for efficient shipping with pre-configured tax and transit settings, reducing order fulfillment time.
Product
All products listed under the ‘Local Delivery’ option are displayed here, and you can easily edit and update them from this section.

Find your shipping template
Step 1: Log into Your Amazon Seller Central Account
- Open your web browser and visit the Amazon Seller Central website (sellercentral.amazon.com).
- Enter your login credentials, including your username and password.
- Click the “Sign In” button to access your Amazon Seller Central account.
Step 2: Navigate to Shipping Settings
- After successfully logging in, you’ll find yourself on the Seller Central dashboard.
- In the top right-hand corner of the screen, hover your mouse cursor over the “Settings” option in the navigation bar. A drop-down menu will appear.
- From the dropdown menu, select “Shipping Settings.”
- You have now accessed your Amazon shipping settings, where you can find your shipping template.
How to create a shipping template
Step 1: Log into Your Amazon Seller Central Account
- Launch your web browser and visit the Amazon Seller Central website (sellercentral.amazon.com).
- Input your login credentials, including your username and password.
- Click the “Sign In” button to access your Amazon Seller Central account.
Step 2: Access Shipping Settings
- After successfully logging in, you’ll be directed to the Seller Central dashboard.
- In the top right-hand corner of the screen, move your mouse cursor over the “Settings” option in the navigation bar to reveal a dropdown menu.
- From the dropdown menu, select “Shipping Settings.”
Step 3: Create a New Shipping Template
- Within the Shipping Settings, locate the option that allows you to “Create New Shipping Template.”
- Click on this option to initiate the template creation process.
- You’ve now successfully initiated the process to create a new shipping template in your Amazon Seller Central account.
Related Articles
App Guide
This App Guide section comes with a host of video tutorials to help you understand the functionalities of the CedCommerce Amazon Channel app in an easy and simplified way. Scroll to discover detailed information about the app functionality and ...How To List Variant Products on Amazon?
How To List Variant Products on Amazon? If you have product variants listed on Shopify and wish to upload the same on Amazon, you can follow these steps to upload variant products via the app. It will help you seamlessly upload product variants from ...Getting Started with CedCommerce Amazon Channel
How to connect your Shopify Store with Amazon? CedCommerce Amazon Channel, the native Shopify Sales Channel App helps you integrate your Amazon Seller Account with your Shopify store faster than ever before. Whether you are selling with a ...How to initiate Amazon Lookup for all or selected products?
How to initiate Amazon Lookup for all or selected products? Amazon Lookup (previously known as “Search on Amazon”) is a feature CedCommerce provides that lets you list your Shopify product on Amazon as an offer. If your product’s barcode is already ...Overview of the App
The Overview page of the CedCommerce Amazon Channel app is a comprehensive dashboard that serves as your central command center for efficiently managing all essential operations related to your Amazon- Shopify channel management. From staying updated ...