Sears Carrier Mapping
Currently, Sears accepts only specific shipping carriers and their specific methods, so the store owners have to map their Shopify carriers with the Sears carriers and their specific methods to ignore the order rejection. To check sears accepted carriers list, click here.
The store owner can add the Carrier mapping and delete the mapping those are no more required.
To manage the Sears Carrier mapping
- Go to the Sears Marketplace Integration App.
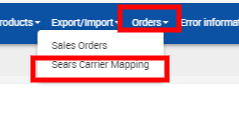
- On the top navigation bar, click the Order menu.
The menu appears as shown in the following figure:

- Click Sears Carrier Mapping.
The Shopify-Sears Carrier Mapping page appears as shown in the following figure:

- To add the carrier mapping, do the following steps:
- Click the Add Mapping button.
The page appears such as shown in the following figure:

- In the Shopify Carrier column, enter the required carrier name.
- In the Sears Carrier column of the respective row, select the corresponding carrier from the list to map it to the corresponding Shopify Carrier.
- In the Sears Method column of the respective row, select the required Sears method from the list.
- Click the Add Mapping button to add more carrier names if required.
- Click the Submit button. A success message appears on the page.
- Click the Add Mapping button.
The page appears such as shown in the following figure:
- To delete the carrier mapping, do the following steps:
- Scroll down to the required carrier row.
- In the Action column of the respective row, click the Delete button.
The respective carrier mapping is deleted and remove from the Shopify-Sears Carrier Mapping page.
Related Articles
Map Sears Attributes with Options
Apart from mapping the categories, the attribute mapping and option mapping are also important when the store owners have variation products. Before uploading the variation products to the Sears marketplace, they need to map the attribute of their ...Registration and Sears Configuration Setup
Once the Sears Marketplace Integration app is successfully installed in the Shopify store and the API credentials are received from the Sears Seller Account, the admin has to follow the Registration process and set up the configuration settings to ...View Sears Attributes
To view all the Sears attributes Go to the Sears Marketplace Integration App. On the top navigation bar, click the Products menu. The menu appears as shown in the following figure: Click View sears attributes. The Sears Category attributes page ...Sears Other Configurations Settings
Once the store seller has installed the app on the store and completed the four steps procedure of registration and the Sears Configuration settings, they have to proceed further with the other configuration settings through the app. To set up the ...View Sears Category
To view all the Sears categories Go to the Sears Marketplace Integration App. On the top navigation bar, click the Products menu. The menu appears as shown in the following figure: Click View Sears Category. The Sears Categories page appears as shown ...