Ship and Delete the Amazon Orders
Ship and Delete the Amazon Orders
The Magento 2 store owners can fetch the new orders and view all the order details fetched from Amazon. They can also ship the required orders and can delete the orders those are no more required.
To fetch and view new orders
- Go to the Magento 2 Store Admin panel.
- On the left navigation bar, click the AMAZON INTEGRATION menu.
The menu appears as shown in the following figure:
- Click on Orders.
The Manage Amazon Orders page appears as shown in the following figure:
- Click the Import Orders button.
If the order is imported successfully then, a new record is found in the Orders Grid table as shown in the figure.
Notes:- Orders are automatically imported through CRON every 10 minutes.
- Whenever the latest orders are imported from Amazon, a Notification appears in the notification area of the Admin panel for those orders and they are Auto-Acknowledged as soon as they are imported in the Magento 2 store admin panel.
- If no order is imported, then check the Failed orders listed on the Amazon Failed Order page.
- Order is auto-rejected on Amazon in the following conditions:
- When Amazon Product SKU does not exist in Magento 2 store.
- When Product is Out of Stock in Magento 2 store.
- When a product is disabled in Magento 2 store.
- To View the Amazon order, do the following steps:
- Scroll down to the required order row.
- In Actions column of the respective row, click the View icon.

The specific order appears as shown:
- To edit the Amazon order, do the following steps:
- Scroll down to the required order row.
- In the Actions column of the respective row, click the Edit icon.

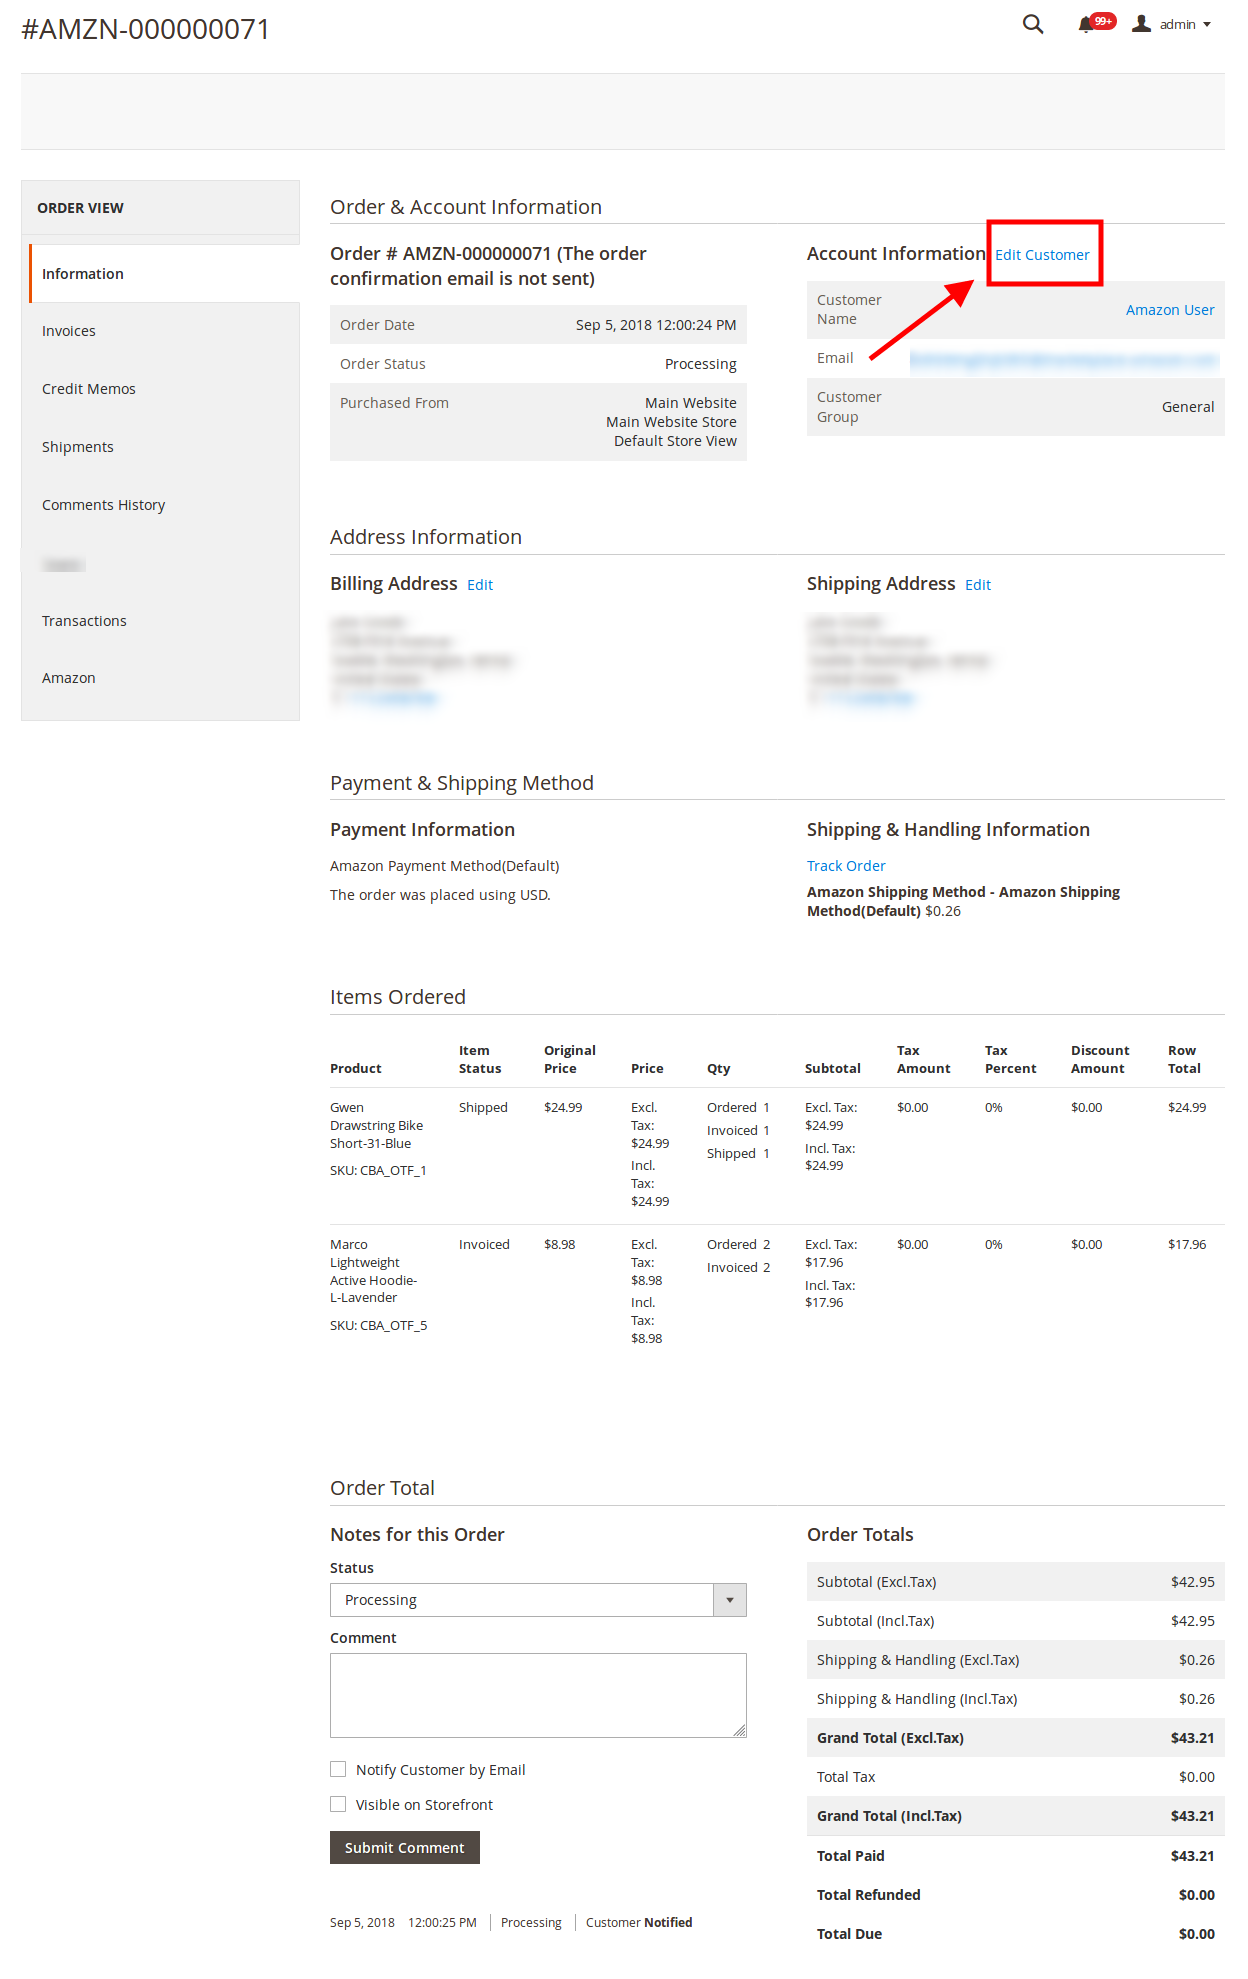
The order gets opened to be edited as shown below:
- You may edit the customer details by clicking on the Edit Customer button highlighted in the above image. Similarly, you may edit the Address Information under the corresponding field.
- To synchronize the Amazon order, do the following steps:
- Scroll down to the required order row.
- In the Actions column of the respective row, click the Sync icon.

The specific order is synchronized and a success message appears.
- To delete the Amazon order, do the following steps:
- Scroll down to the required order row.
- In the Actions column of the respective row, click the Delete icon.

The specific order is synchronized and a success message appears.
To ship the Amazon order
- Go to the Amazon Orders Grid.
- In the Action column of the respective row, click the Edit icon.

- You will be navigated to the Amazon Order Information Page. Click on Ship.

- Do the Shipment from the navigated panel. The shipped orders will be synced with the crons.
To perform actions in bulk
- To Sync the selected Amazon orders in bulk, do the following steps:
- Select the checkboxes associated with the orders that you want to sync.
- Click the Arrow button next to the Actions list.
- Click on Sync. The menu further expands as shown below:

- To synchronise the shipment of the orders, click on Shipment.
- To create an order again if the order is failed, click on Create Order.
- Click on Fetch & Create Order, to run the API call again and create the order.
- To delete the selected Amazon orders in bulk, do the following steps:
- Select the checkboxes associated with the orders those are no more required.
- Click the Arrow button next to the Actions list.
A menu appears as shown in the following figure:
- Click Delete Order(s).
A confirmation dialog box appears. - Click the OK button.
The selected orders are deleted from the Amazon Marketplace.
Related Articles
Mage Amazon Orders
Manage Amazon Orders *To manage Amazon orders you can refer to this video:* Or you can also read here to manage the Amazon orders: Fetch, View, Ship, and delete the Amazon OrdersAmazon Feeds
Amazon Feeds After uploading the product on Amazon or after updating the product inventory or the product price, the user can check the status of the feed and sync the selected feeds from the Amazon Feeds page. To view and manage the product feeds Go ...Amazon Integration Configuration Settings
Amazon Integration Configuration Settings *You can refer to this video for configuration of the extension:* You can also read these steps to set up the configuration settings in the Magento 2 Admin panel Go to the Magento 2 Admin panel. On the left ...Delete the Profiles
Delete the Profiles To delete a profile Go to the Magento 2 Store Admin panel. On the left navigation bar, click the AMAZON INTEGRATION menu, and then click Profile Manager. The Manage Profile page appears as shown in the following figure: On this ...Amazon Reports
Amazon Reports To view the Amazon Reports Go to the Magento 2 Admin panel. On the left navigation bar, click the AMAZON INTEGRATION menu. The menu appears as shown in the following figure: Click on Report. The Amazon Report grid opens as shown below: ...