TikTok Shop Setup Wizard (Onboarding)
Setup Wizard
Click on TikTok Shop Marketplace from the left-hand menu.
You will be redirected to TikTok Shop Setup Wizard. Herein, you will get four steps to set up your TikTok Shop wizard. These are as follows:
- User Registration
- Marketplace Onboarding
- Default Policies
- Summary
Now, let's discuss these steps in detail.
User Registration
- Start by providing your email address
- Accept the terms & conditions
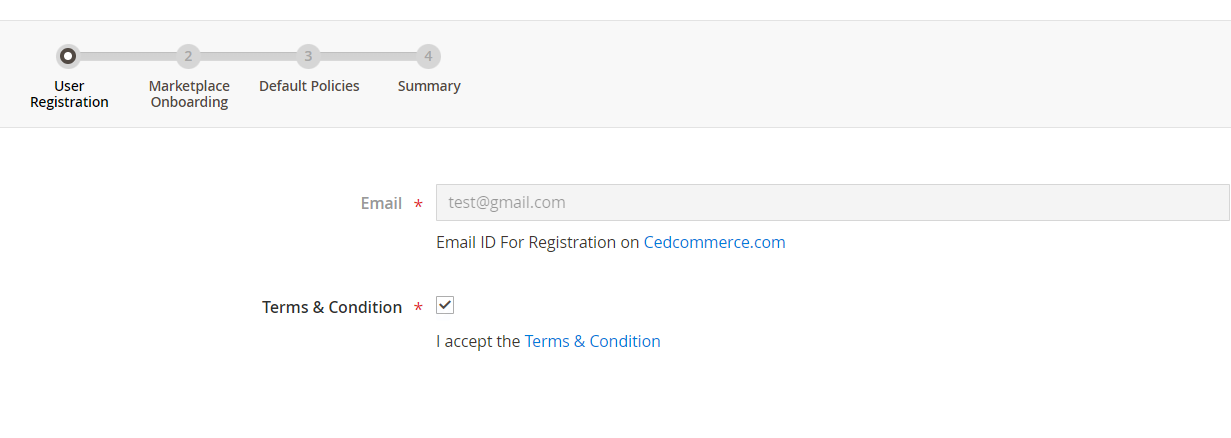
- Click on the Next button, located at the top of the page.

Marketplace Onboarding
- Title: Provide a Shop name for easy identification.
- Region: Select the region (US, UK, ES, or IE) where your TikTok Shop will operate.
- Store View: You can select store view for the app to display the product information and updates of the TikTok Shop. The App processes products and order information in your TikTok Shop based on the store view you have selected here.
- Locale: Select the local language in which you want to operate the App. All the information on the App such as category names, attributes, alerts, etc will be displayed in the local language selected by you here.
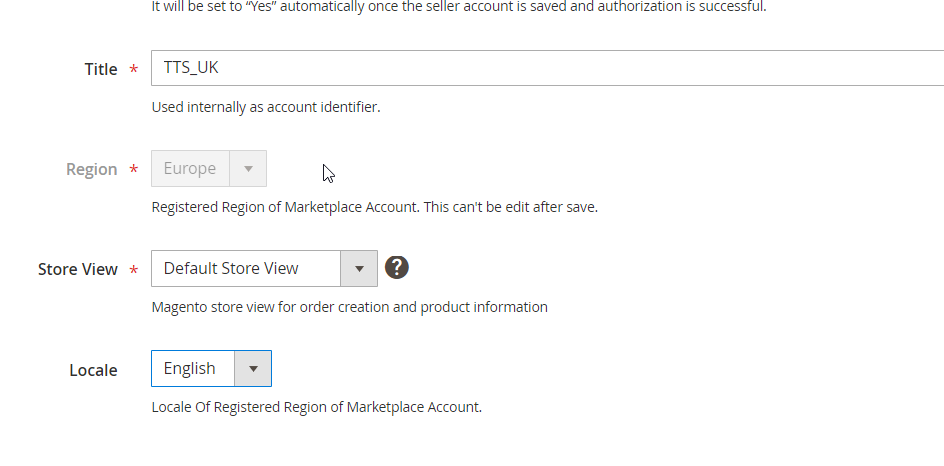
- Click on the Next button, located at the top of the page.
- You will be redirected to the TikTok Shop seller center page for authorization.
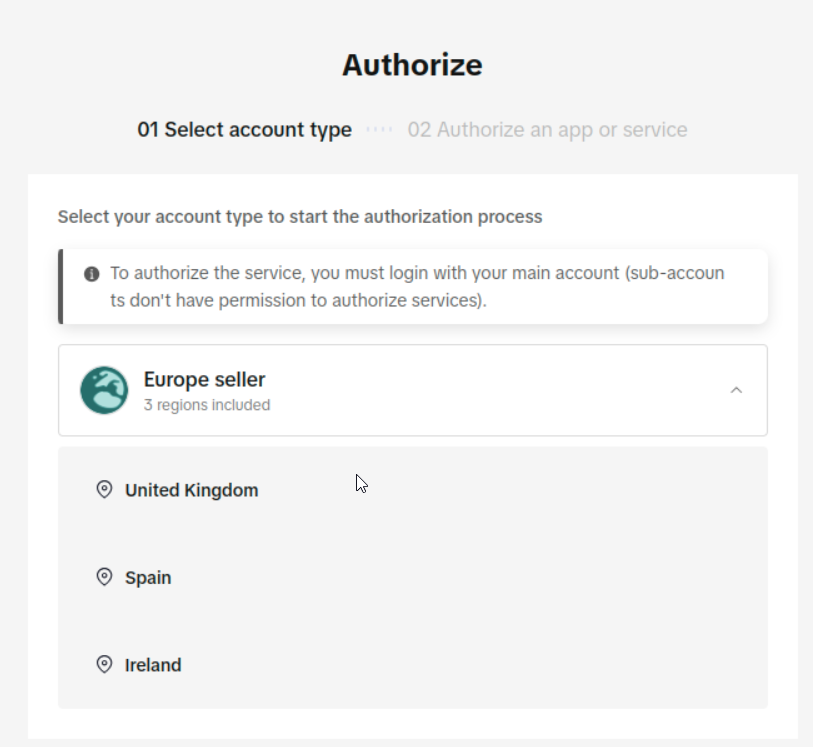
- Log in with your credentials and authorize the app to enable it to manage your Shop account.
Once the seller account is saved and authorization is successful, the Verified button will automatically be turned on to display that your Shop is verified and you can proceed further with the onboarding.

Default Policies
Once you complete your account authorization you'll be redirected to the next step which is to configure the default policies containing the following sections in its grid:
- Title: It displays the name of the policy in the app.
- Is Default: It displays that the policy is part of the default setting, necessary to complete TikTok Shop setup.
- Type: It displays the functional section the policy relates to. For example, inventory, pricing, etc.
- Created At: It displays the date of creation of the policy.
- Updated At: It displays the date on which the policy is updated.
- Status: It displays whether a policy is valid and completed to proceed further with the Setup or if any action is required.
- Action: You can edit any policy through this tab.

You can find the following default policies in this section:
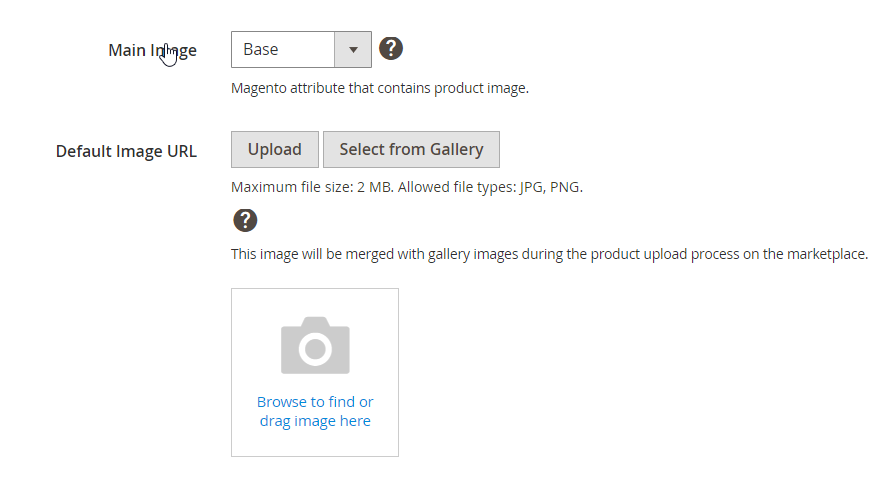
1. Default Image Policy:
- Title: You can add the name of the policy to help you easily identify it.

- Main Image: You can select a custom image to be displayed in your Shop. You can choose from: - Base Image - Small Image - Swatch Image - Thumbnail Image according to your requirements.
- Default Image URL: You can upload an image to be reflected next to the products that do not have any images.
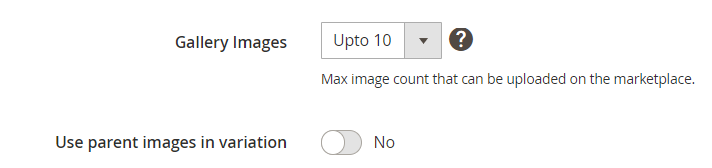
- Gallery Images: You can select the maximum number of images to be uploaded to TikTok with your products. For example, if you have 20 images of Product A on Magento but wish to upload just 10 images on TikTok, you can set the max count to 10.
- Use Parent Images in Variation: You can enable this option to use parent images for those variation products that do not have their images.
Once you’re done, click on Save. You will be redirected to the Default Policy page once again to proceed with other policies set up.
2. Default Inventory Policy:
- Title: You can add the name of the policy to help you easily identify it.
- Default Quantity: Add default inventory quantity for situations where Magento Manage Stock is disabled, in which case, the default quantity for each product will be taken from here.
- Threshold Buffer: Add the number of stock here, which will be deducted from the actual inventory available while posting on TikTok Shop. It means a specified quantity of inventory is withheld in the back and the rest is uploaded. This enables you to manage the situation of overselling. For example, if you have 100 products in inventory and you have added 10 as the threshold buffer, 90 stocks will be visible on TikTok Shop for sales.

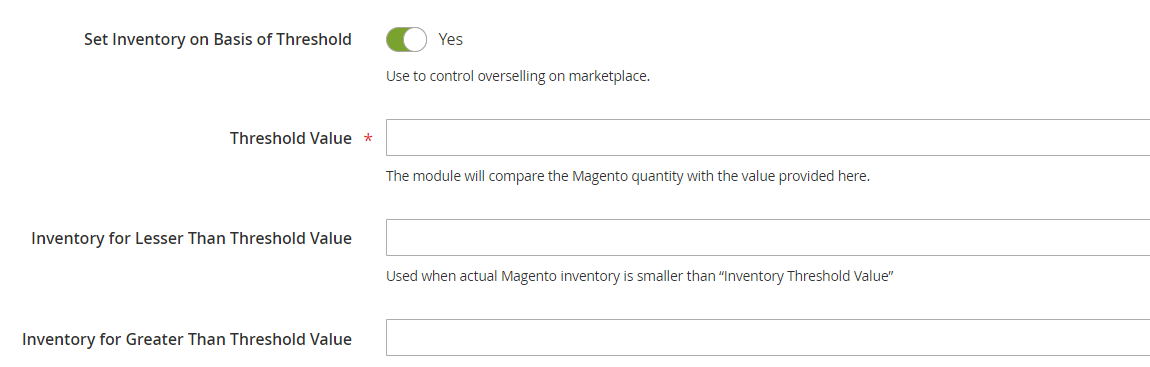
- Set Inventory on Basis of Threshold: Enabling this option can help you avoid overselling on TikTok Shop. Upon enabling this option, you will get the following fields:
- Threshold Value: You can set a minimum inventory level, after which the product will reflect “Out Of Stock” status.
- Inventory for Lesser than Threshold Value: The value that will be fetched to be displayed on TikTok Shop when the Magento inventory for a specific product is less than the value set for Threshold Value.
- Inventory for Greater than Threshold Value: Add a value that will be synced to TikTok Shop for the products that have Magento inventory greater than the Threshold value. For example, if you have 10 inventory in your Magento store, the "Threshold Value" is set at 5, and "Inventory for Greater Than Threshold Value" is set at 8, initially, 8 inventory will be synced to TikTok Shop and will remain the same until the Magento inventory reduces to 5. At this point, 5 quantities will be synced to TikTok Shop. As soon as the Magento inventory reaches 4 and there is a value in the "Inventory for Lesser Than Threshold Value" field, then the same will be synced to the TikTok Shop.
- Warehouse: Select the Magento warehouse that you wish to map with your TikTok Shop warehouse to manage your orders smoothly.

- MSI Settings: Enable this option to add multiple Magento warehouse locations with your TikTok Shop stocks. You can add multiple Magento warehouses to your TikTok Shop warehouse.
3. Default Pricing Policy:
- Title: You can add the name of the policy to help you easily identify it.
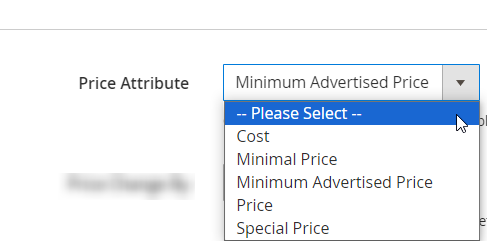
- Price Attribute: You can choose a Magento pricing attribute to be visible on TikTok Shop basis the price that aligns with the selected attributes.
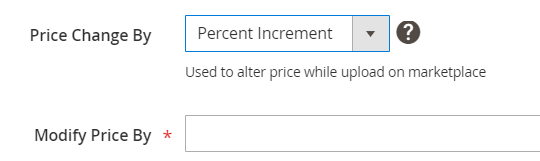
- Price Change By: You can set the price rule, i.e., set percentage increase or decrease or fixed price increase and decrease rule. For example, if you want an increase of 10% on all products, choose percentage increment & then write 10.
- Currency Conversion Rate: You can set your TikTok Shop currency here if your base currency on Magento is different from the currency of the region selected by you for your TikTok Shop.

4. Default Order Policy:
- Title: You can add the name of the policy to help you easily identify it.
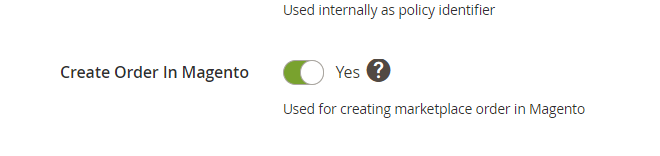
- Create Order in Magento: Enable this option to create TikTok Shop orders on Magento for easy management of your Store and Shop.
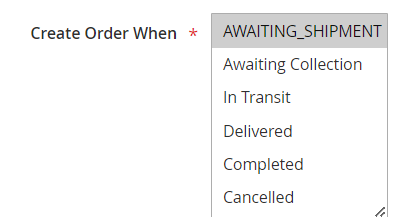
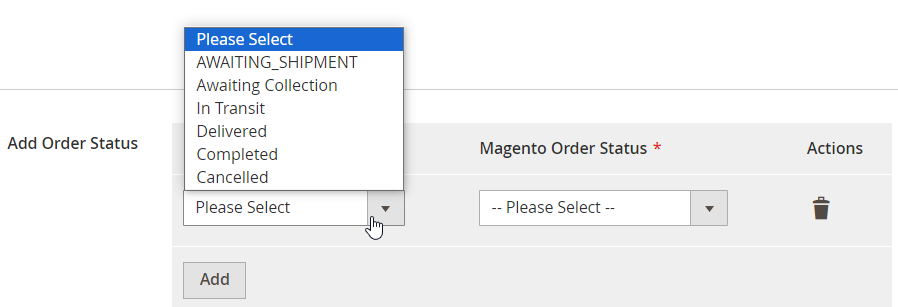
- Create Order When: Select TikTok Shop order status for orders to be created on Magento once they fulfill the order status mark selected by you. The following order statuses are visible here:
- Awaiting Shipment: When an order is received on TikTok Shop and created on the Magento store, it shows an “Awaiting Shipment” status, meaning no shipping carrier has been allotted yet.
- Awaiting Collection: When a seller fulfills the package using “shipped by seller” as the shipping method, the order status will show “Awaiting Collection” before the order is packed and shipped.
- In Transit: When a seller fulfills the package using “shipped by seller” as the shipping method, the awaiting shipment orders status will change to “In transit” when TikTok Shop receives the tracking information from carriers.
- Delivered: Orders that have been successfully delivered at the destination by the carrier are reflected under this section.
- Completed: Once an order is delivered successfully and no return or refund request is raised by the buyer, the status will auto-update to “Completed” within 14 days from the delivery date.
- Cancelled: The order placed by a buyer can be cancelled by you or the buyer via the app by providing a proper reason. The status of the same will be updated on TikTok Shop.
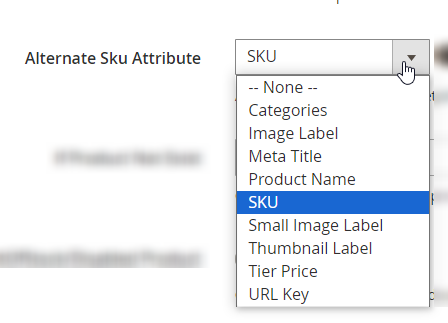
- Alternate SKU Attribute: Products are mapped and matched across Magento and TikTok Shop. Through this section, you can choose values like SKU, Name, etc, which will be considered for mapping the products. The values available are:
- Categories
- Image Label
- Meta Title
- Product Name
- SKU
- Small Image Label
- Thumbnail Label
- Tier Price
- URL Key
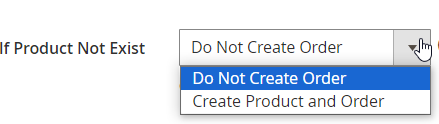
- If Product Not Exist: Here you can choose an action in case a line item does not exist on Magento but an order for the same is placed in TikTok Shop. You can either choose to create a product and order on Magento for such items or restrict order creations for such items.
- Order for Out of Stock/Disabled Products: Enabling this option will help you in creating orders for line items that are out of stock or have been disabled by you, for any reason.
- Use Magento Taxes: Enable this option to smoothly manage the syncing of order taxes between your Magento store and TikTok Shop for eligible orders.

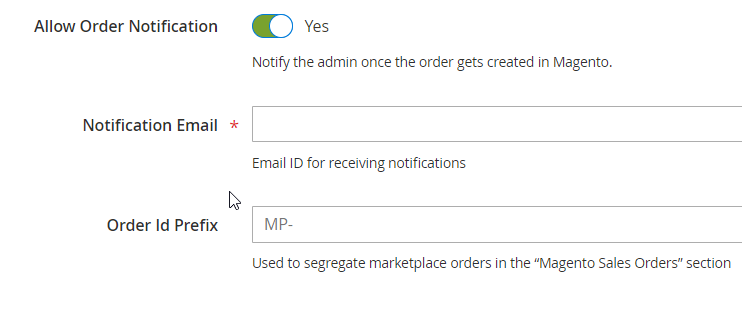
- Allow Order Notification: You can enable this option to receive notifications/alerts every time an order is placed on TikTok Shop and created on Magento. Just add the email address you wish to receive notifications and you’ll be updated regularly.
- Order ID Prefix: You can add an order prefix for all the orders received from TikTok Shop to help you segregate them effortlessly on your Magento Sales Order board.

It is recommended to use the marketplace prefix, i.e., TikTok Shop or TTS to help you understand the marketplace orders without any confusion.
- Invoice Creation: Enabling this option will create invoices for the orders received in the Magento Sales Order board for easy access and overview.
- Carrier Mapping: With this option, you can map/link the Magento Shipping carrier with the TikTok Shop shipping carrier. For example, if you ship products from Magento Shipping carrier DHL but DHL is available on TikTok Shop with another name – DHL US, you can map these shipping carriers. So now, when you ship a product on Magento using DHL, it will automatically sync and show the TikTok Shop shipping carrier as DHL US. This will prevent any shipping errors.

- Customer Settings: Each time an order is placed from TikTok Shop, Magento creates a customer to be reflected in the Magento Sales Order board. You can choose from:
- Guest Customer: Guest checkout will be used to create an order in Magento, with basic details such as Shipping Address to differentiate between multiple orders.
- Real Customer: A unique customer will be created in Magento based on the customer's email ID. For ex., a customer will get created with {customer_id}@{marketplace}.com email and will be used to create an order in Magento.
- Same Customer: The customer with the provided email will be used for creating all orders in Magento.

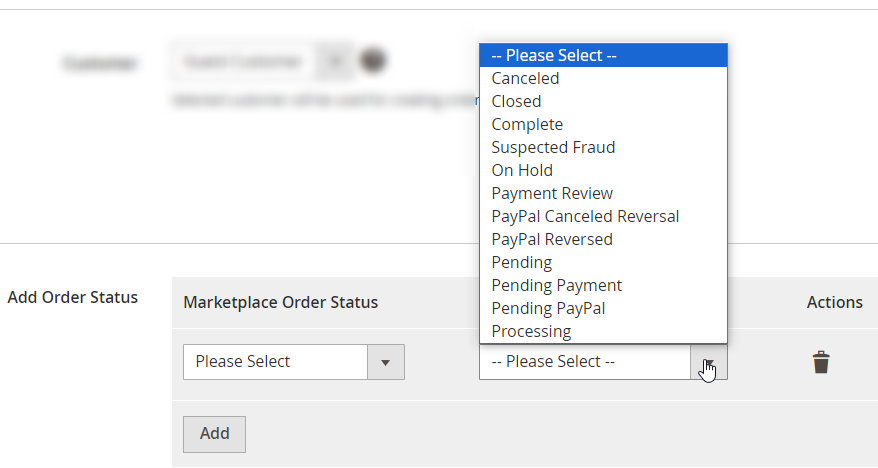
- Order Status Mapping: You can map the order status available for TikTok Shop with those on Magento to avoid confusion and undue efforts in cross-verifying them manually.
5. Default Synchronization Policy:
- Title: You can add the name of the policy to help you easily identify it.
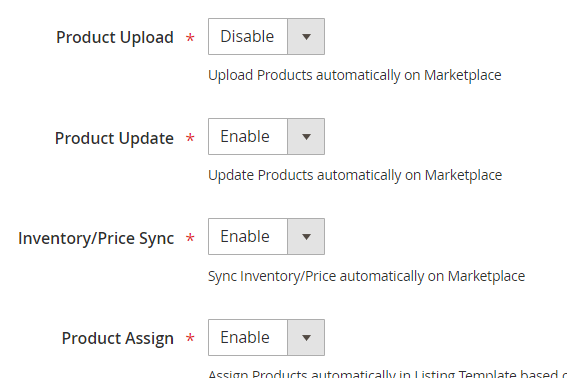
- Product Upload: You can enable this option to sync product upload between your Magento Store and TikTok Shop.
- Product Update: Enable this option to sync any product update information between your Magento Store and TikTok Shop to avoid filtering important details.
- Inventory/Price Sync: Enable this option to sync inventory and price between your Magento store and TikTok Shop to avoid discrepancies.
- Product Assign: Enable this option to assign products directly to a defined category template based on the query you provided.
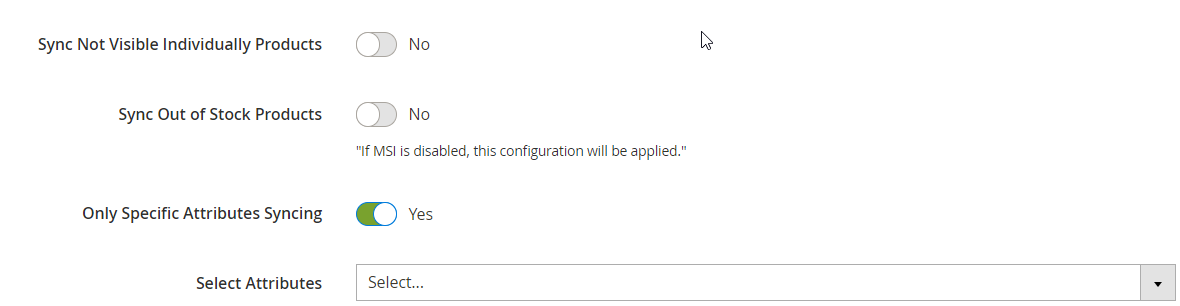
- Sync not Visible Individual Products: The variation products are not usually visible on the Magento Sales Order board. Enabling this option will sync individual variation products, even if they are invisible to TikTok Shop.
- Sync Out-of-Stock Products: Enable this option to sync products that are currently out of stock to avoid any stock overload.
- Only Specific Attributes Syncing: Enable this option to choose an attribute that will be mapped and updated on TikTok Shop as soon as it is updated on Magento. In case this option is disabled, all the attributes will be taken into consideration, by default.
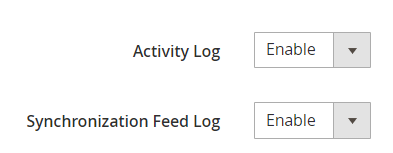
- Activity Log & Synchronization Feed Log: Enable these options to keep track of all your activities and feeds. This will help you identify a reason, in case of any issues, faced in the future.
Summary
If you already have products uploaded on TikTok Shop, you can link your existing products with those on TikTok Shop by clicking on the check box Otherwise, you can click on the Finish tab at the top of the page to complete the Setup Wizard.

Related Articles
Onboarding
CedCommerce offers advanced integration solutions and 24/7 expert support to assist sellers. Our integration/connector apps streamline the synchronization of product listings, inventory, and orders. With our TikTok Shop app, sellers can effortlessly ...Prerequisites for TikTok Shop
Setup your Shop in the app to effortlessly manage your Etsy store and TikTok Shop from one place. TikTok Shop Prerequisites: TikTok requires every seller to fulfill a set of must-haves for their Shop to manage them through an app. These prerequisites ...Installation and Setup
Whether you're expanding your sales channels or stepping into the world of TikTok Shop for the first time, the CedCommerce Connector for TikTok Shop makes integration seamless. Follow the steps below to download, install, and connect the plugin to ...About TikTok Shop Connector
TikTok is not just one of the rapidly evolving social media platforms, but has also emerged as a leading social commerce marketplace with TikTok Shop. With over 1 billion active users, TikTok is a master hub for sellers looking to scale their ...Pre-onboarding
CedCommerce offers advanced integration solutions and 24/7 expert support to assist sellers. Our integration/connector apps streamline the synchronization of product listings, inventory, and orders. With our Etsy TikTok Shop Connector, sellers can ...