Walmart Other Configurations Settings
Once the store owners have installed the app in the store and completed the five steps procedure of registration and the Walmart Configuration settings, they have to proceed further with the other configuration settings through the app.
Set up the other Configuration Settings
To set up other configuration settings, follow the steps given below:
Go to the Walmart Integration app & Click on the “Settings” menu. The following page opens up: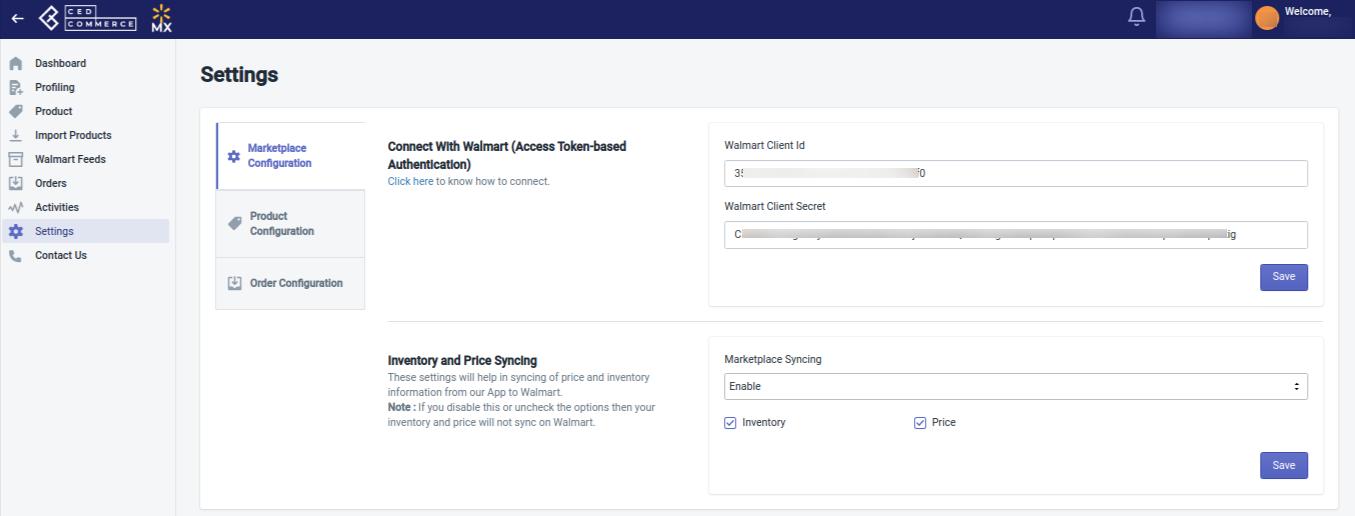
The Settings Section is divided into three sub-sections – Marketplace Configuration, Product Configuration, and Order Configuration.
Follow the below steps to Generate Credentials in the Developer Portal
- Log in to your Walmart Seller Account.
- Click on the Settings icon.
- Then, API- Consumer IDs & Private Keys.
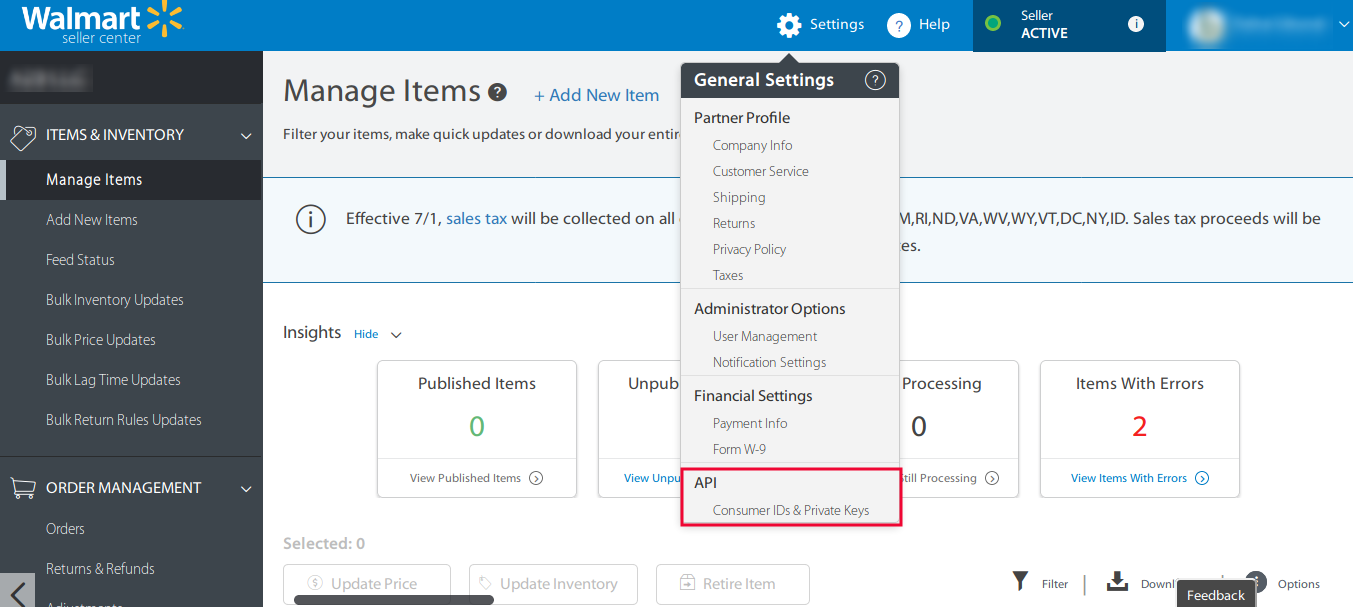
- You will be directed to the API page from where you will get the Consumer ID and Private Key. But just above the Keys, you will see the NOTE, as shown in below image
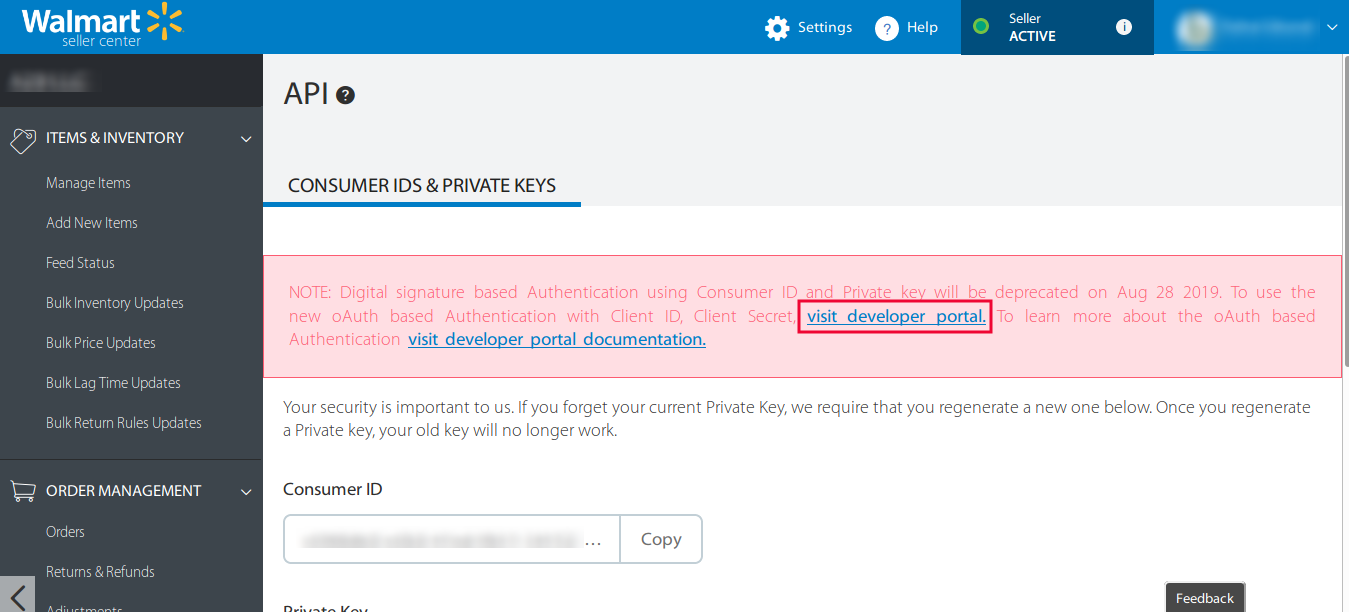
- Click on the visit developer portal.
- You will be directed to the Login page of Developer Portal. Select the US flag under Marketplace Seller Login as the Login Type.
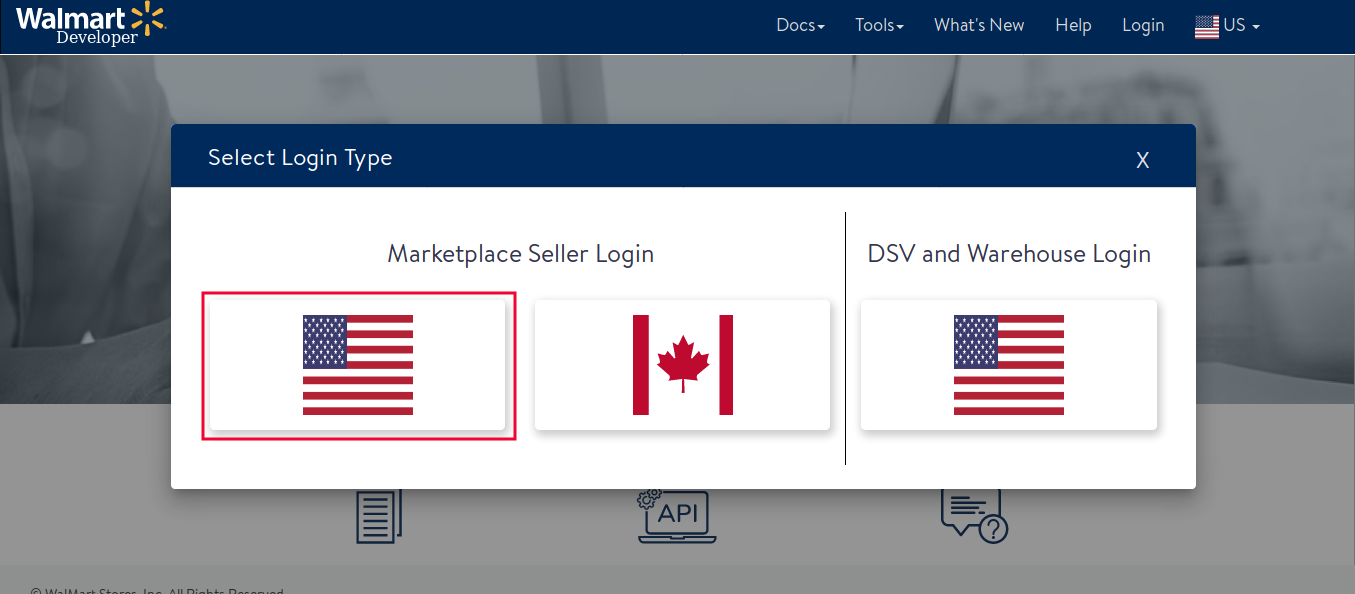
- Once you login to it, you will be on the “OAuth Access Token” section.
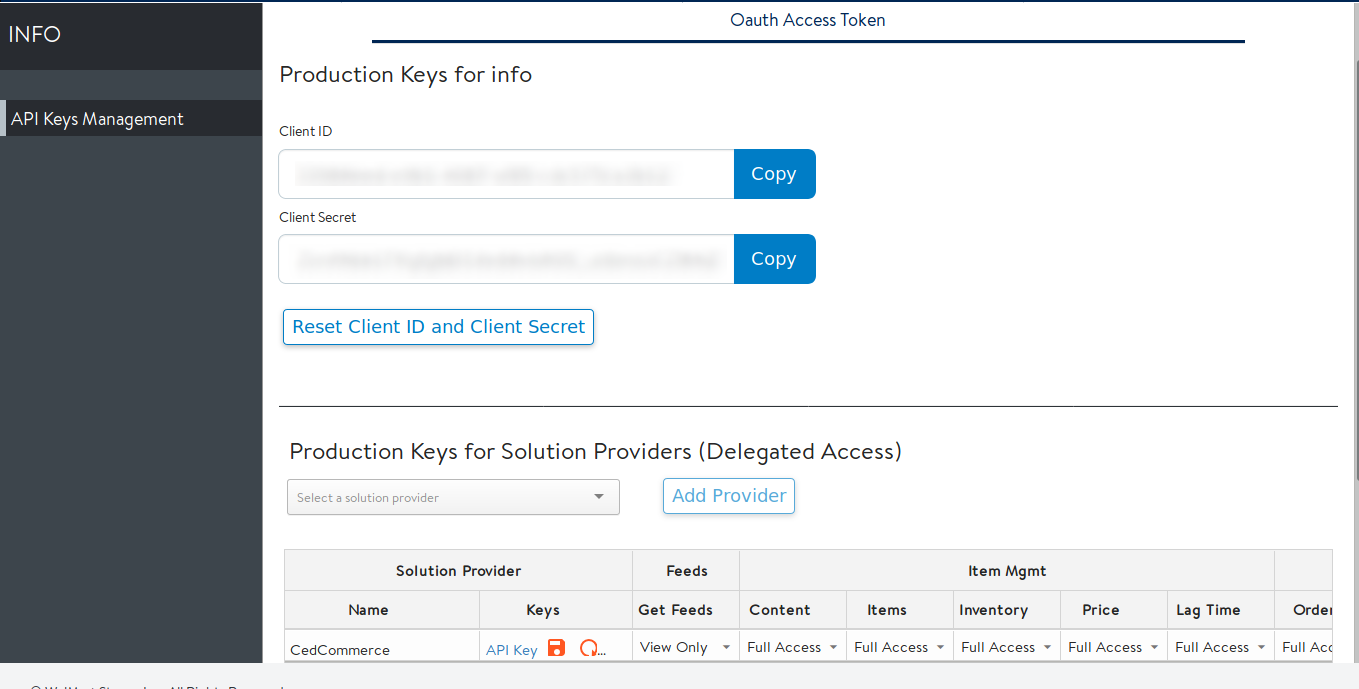
- Here you need to add the solution provider. Add Cedcommerce from the dropdown and click on Add Provider. Confirm in the popup.
- After that provide full access in the fields where there is an option to provide it else select view only for the other fields. As shown in the figure above.
- Now click on API keys and copy and paste both Client Id and Client Secret key.
2. Product Configuration: This section helps you to manage your product-related settings. On clicking Product Configuration, the following page opens up: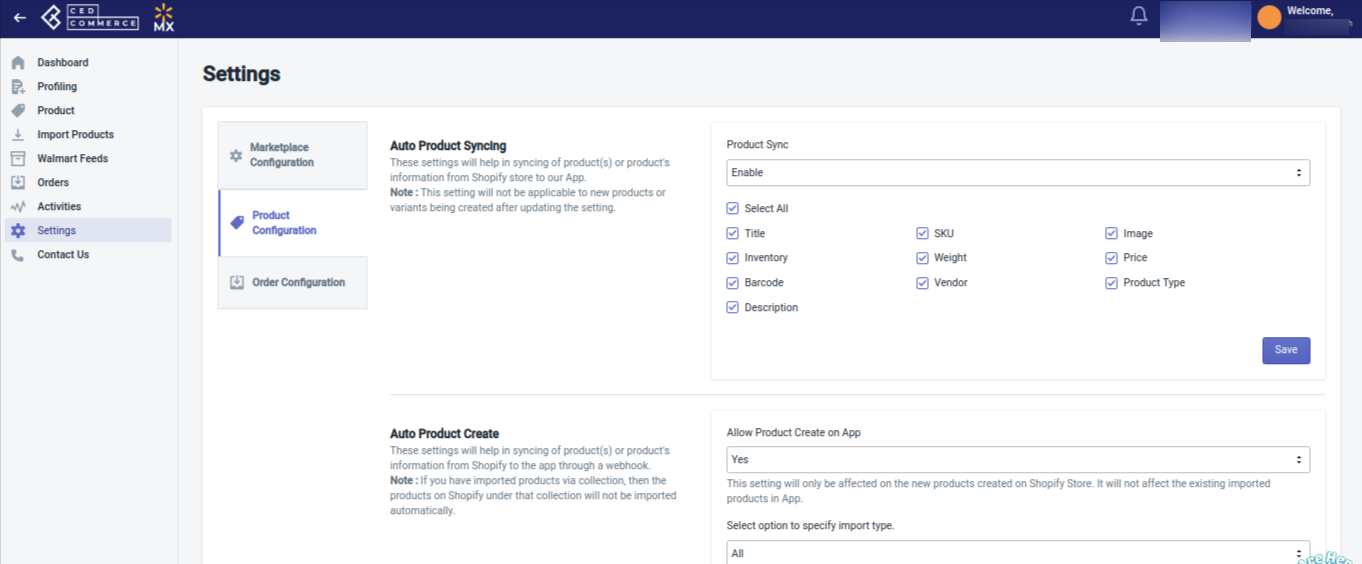
The following sections appear here:
- Auto Product Syncing: Select the checkboxes associated with the required product attributes on the app that you want to be synchronized with the Shopify store.
- Auto Product Create: Selecting Yes here synchronizes new products or product’s information from the store to the app using Webhook.
- Custom Pricing: Select Yes to enable custom pricing(fixed or percentage-wise). It has 2 options Increase Price and
Decrease Price. By selecting any of the two options, you can increase or decrease product prices by a fixed amount or by a fixed percentage. - Walmart Setting: Here, in the Product Tax Code box, enter the tax code that applies to the products. You can also set Free Shipping from here, by selecting Yes or No in the respective box.
- Inventory Management:
- In the Enable Advanced Attribute Form list, select Yes to enable the Advanced Attribute Form.
- In the Threshold Product Inventory box, enter the minimum count of an item that the store owner wants to keep in stock when your product inventory reached that count it will be shown as Out of Stock on walmart.com and you will get a notification for those products on the app dashboard.
3. Order configuration: This setting will allow you to manage your orders accordingly. The section appears as shown in the following figure: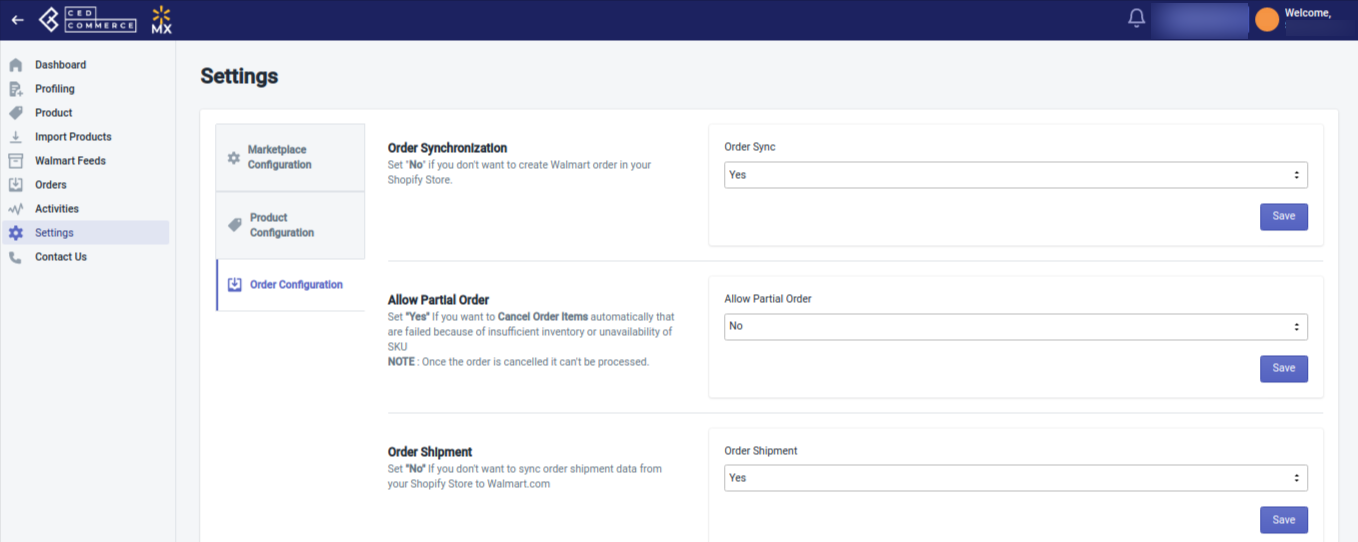
- In the Order Synchronization, select Yes to enable the order synchronization with the Shopify store. This will lead to the automatic creation of Walmart orders in your Shopify store from where you can easily ship them.
- In the Allow Partial Order, select Yes to create partial order in the Shopify store. This setting will help you in fulfilling the partial order, say if you got an order with 3 different ordered SKU and you do not have the quantity for 1 of them then, in that case, you can easily ship the order for other 2 SKUs and the third one will automatically get canceled.
- In Allow Order Shipment, it will allow the shipping information fetched to the app and synced to Walmart to ship the order.
- In 2 Day Shipping, enable yes if you are shipping the products in 2 days.
Click the Save button. The Walmart Configuration settings will be saved.
Note: All the Information saved in the Walmart Configuration settings will be applied to all the products available in the app.
Related Articles
Settings
Once you have installed the app in the store and have completed the five steps of registration and the Walmart configuration settings, you have to proceed further with the other configuration settings through the app. These include: Marketplace ...Order Configuration
Order configuration The order configuration section helps you manage and configure order-related settings for your Walmart products. How to perform Order configuration To configure order management, go to the Walmart Integration app and click Order ...Configuration setup for Walmart Mexico Integration
Configuration Set up for Walmart Mexico Integration Once the Walmart Integration app is successfully installed in your Shopify store and the API credentials are retrieved from the Walmart Seller Account, follow the registration process and set up the ...Marketplace configuration
Marketplace Configuration Settings There are two sections in the marketplace configuration settings: Connect with Walmart (Access Token-based authentication) Inventory and Price syncing Connect with Walmart (Access Token-based authentication) Here ...Product Configuration
Product configuration This section helps you to manage your product-related settings for Walmart. How to perform Product configuration For product configuration, go to the Walmart Integration app and click Product Configuration under the Settings ...