Zalando Configuration Settings
To set up the configuration settings in the Prestashop Admin panel
- Go to the Prestashop Admin panel.
- In the left navigation panel, place cursor on the Zalando Integration menu.
The menu appears as shown in the following figure:
- Click on Configuration.
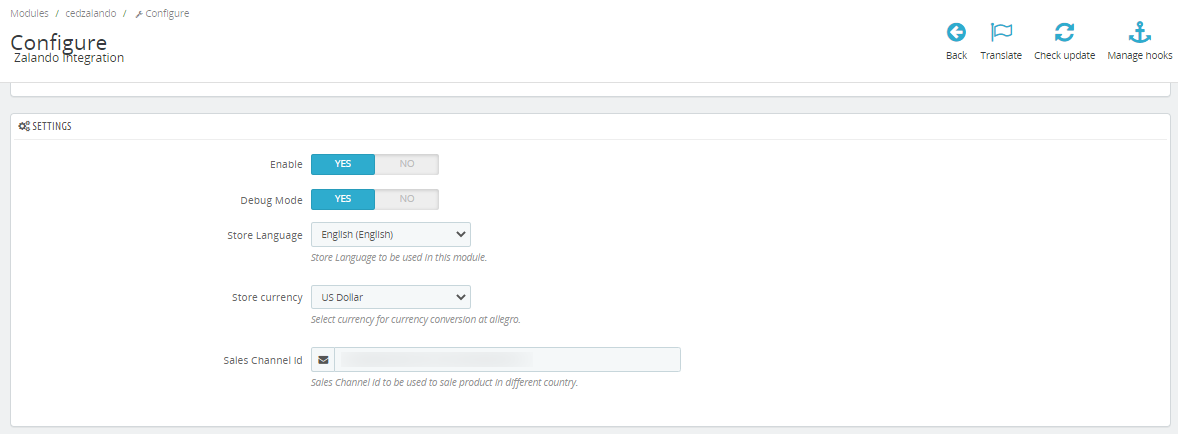
- Go to Settings
The tab appears as shown in the figure:
- In the Settings, do the following steps:
- In Enable, select ‘Yes‘ to enable the module.
- In Debug Mode, select ‘yes‘ to enable the debug mode.
- In-Store Langauge, choose the store language which you want to use for the module.
- In-Store Currency, choose your store currency.
- In Sales Channel ID, you can get these details from Zalando.
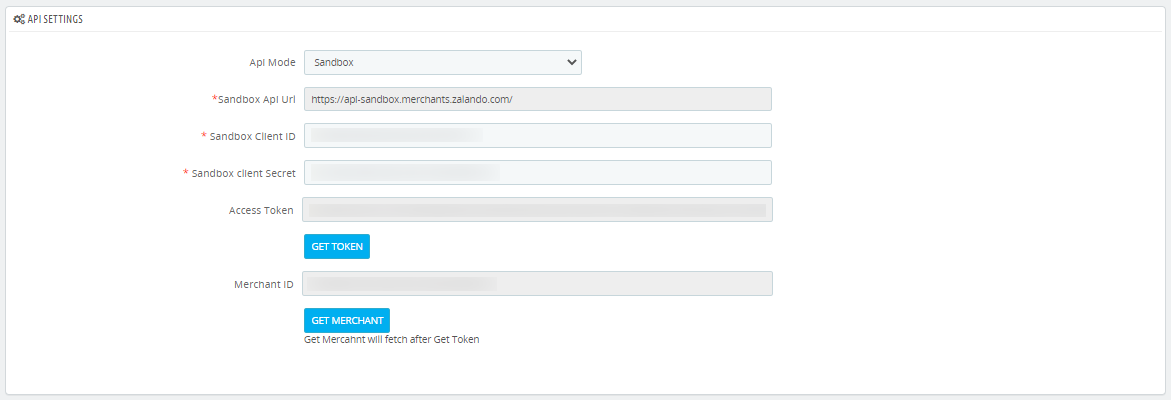
- Now Go to API settings,
The tab appears as shown in the figure:
- In the API settings, do the following steps:
- In API mode, you can choose Sandbox or Live mode.
- These Client ID and Client Secret you can get from the Zalando seller panel.
- After that Click on ‘Get Token’ to generate token and click on ‘Get Merchant’ to generate merchant token.
- Now move to Product Settings,
The tab appears as shown in the figure:
- In the Product Settings, do the following steps:
- In Price Variation, you can modify your price by Percentage or Fixed Amount.
- In Upload Disabled Product, you can upload disabled products you can choose ‘Upload’ otherwise ‘Skip’
- In Update Stock/Price on Edit, you can click on ‘Yes’ to enable the cron.
- In Update Product on Edit, you can update the product on Zalando on edit at the store.
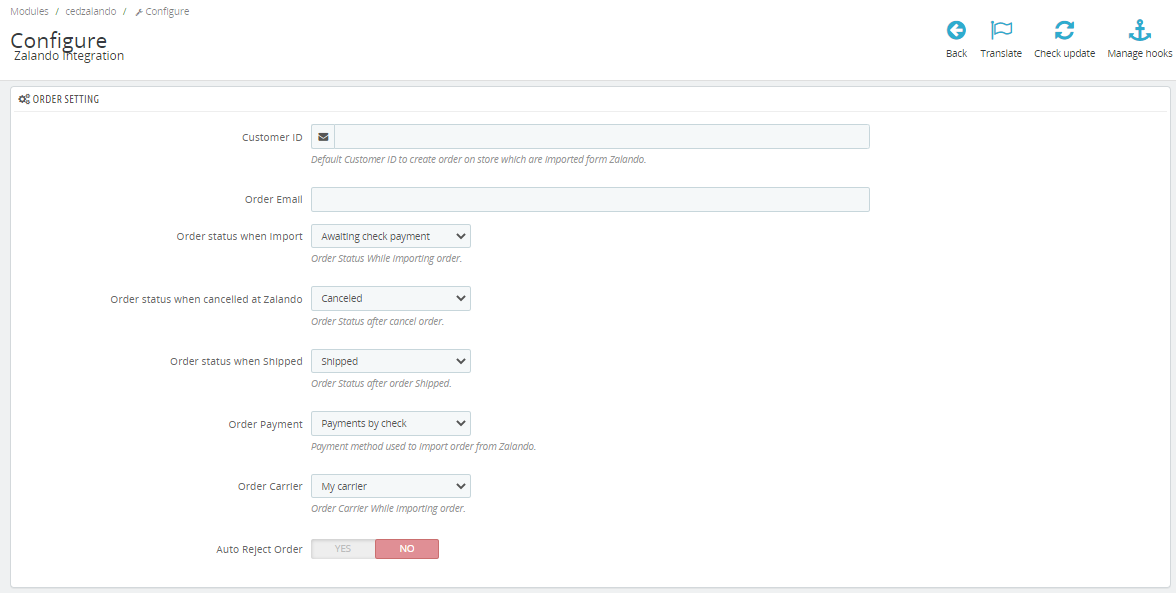
- Now move to Order Settings,
The tab appears as shown in the figure:
- In the Orders settings, do the following steps:
- In the Customer ID, Default Customer ID to create orders on stores that are imported from Zalando.
- In the Order Email, you can enter the default email from which you want to create orders.

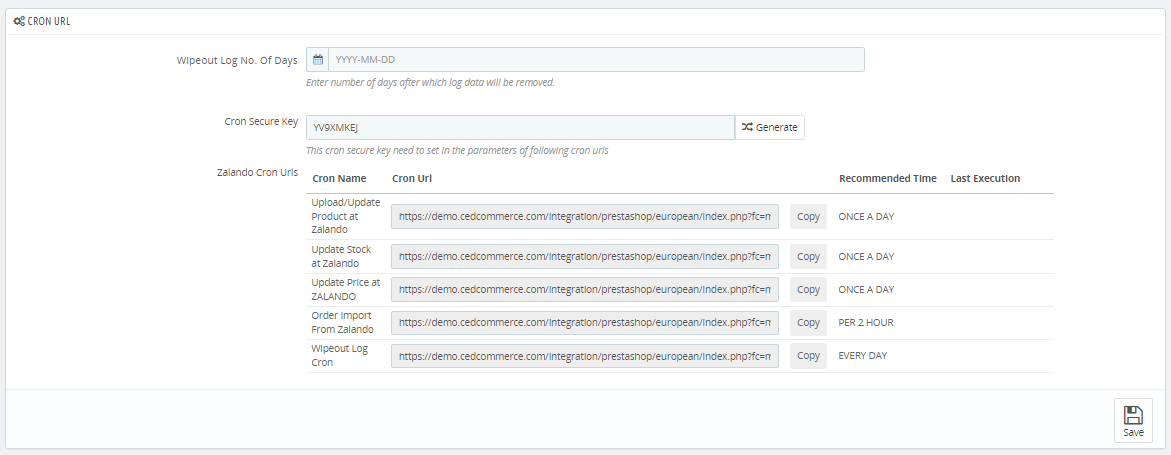
- Here you can see all cron URLs. You can copy the URLs and set them up on your servers for automatic update inventory, prices, orders, logs wipeout.
- After that click on the ‘Save’ button to save the configuration.
Related Articles
Zalando Orders
To see Zalando Orders in the Prestashop Admin panel Go to the Prestashop Admin panel. In the left navigation panel, place cursor on the Zalando Integration menu. The menu appears as shown in the following figure: Click on Orders, The tab appears as ...Zalando Logs
To see Zalando Logs in the Prestashop Admin panel Go to the Prestashop Admin panel. In the left navigation panel, place cursor on the Zalando Integration menu. The menu appears as shown in the following figure: Click on Logs The tab appears as shown ...Zalando Profile
To set up the Zalando Profile in the Prestashop Admin panel Go to the Prestashop Admin panel. In the left navigation panel, place cursor on the Zalando Integration menu. The menu appears as shown in the following figure: Click on Profile, The tab ...Zalando Products
To upload Products Go to the Prestashop admin panel. In the left navigation panel, place the cursor on the Zalando Module menu. The menu appears as shown in the following figure: Click on Products, The tab appears as shown in the figure: In this ...Zalando Bulk Upload
To upload the Zalando Products in the Prestashop Admin panel Go to the Prestashop Admin panel. In the left navigation panel, place cursor on the Zalando Integration menu. The menu appears as shown in the following figure: Click on Bulk Product. The ...