Onboarding Guide: AliExpress Shopify Connector
Onboarding Guide
Step 1: Create a custom app
Enable custom app development from the Shopify control panel.
You must either be the store owner or a staff member with the Enable App Development permission to enable custom app development.
From your Shopify dashboard, click on Settings > Apps & Sales Channels.
Click on Develop applications.
Click on Allow custom application development.
How to create and install a custom application?
Step 1: Create a custom app
Before you can start syncing products, inventory, and orders between Shopify and AliExpress, you need to create a custom app in your Shopify store and connect it to the CedCommerce AliExpress app.
This setup is done once and takes only a few minutes.
Step 1: Create a custom app on Shopify
Enable custom app development
Before creating a custom app, you must enable custom app development in your Shopify admin. You must be the store owner or have the Enable app development permission.
Steps:
Log in to your Shopify Admin.
Go to Settings > Apps.
Click Develop applications.
Click Build apps in Dev Dashboard.
Create and install a custom application
Follow the steps below to create your custom app:
From your Shopify dashboard, go to Settings > Apps.
Click Develop apps.
Click Build apps in Dev Dashboard.
Click Create an application.
In the modal window, enter the application name (for example: AliExpress Integration).
Click Create application. Configure the custom app
After creating the app, configure the following settings carefully.
Disable embedded app and add App URL
Open the App setup section.
Disable Embed app in Shopify admin.
In the App URL field, enter:
https://aliexpress.cifapps.com/
Open the App setup section.
Disable Embed app in Shopify admin.
In the App URL field, enter:
https://aliexpress.cifapps.com/
Select Webhooks API version
Select 2025-04 as the Webhooks API version.
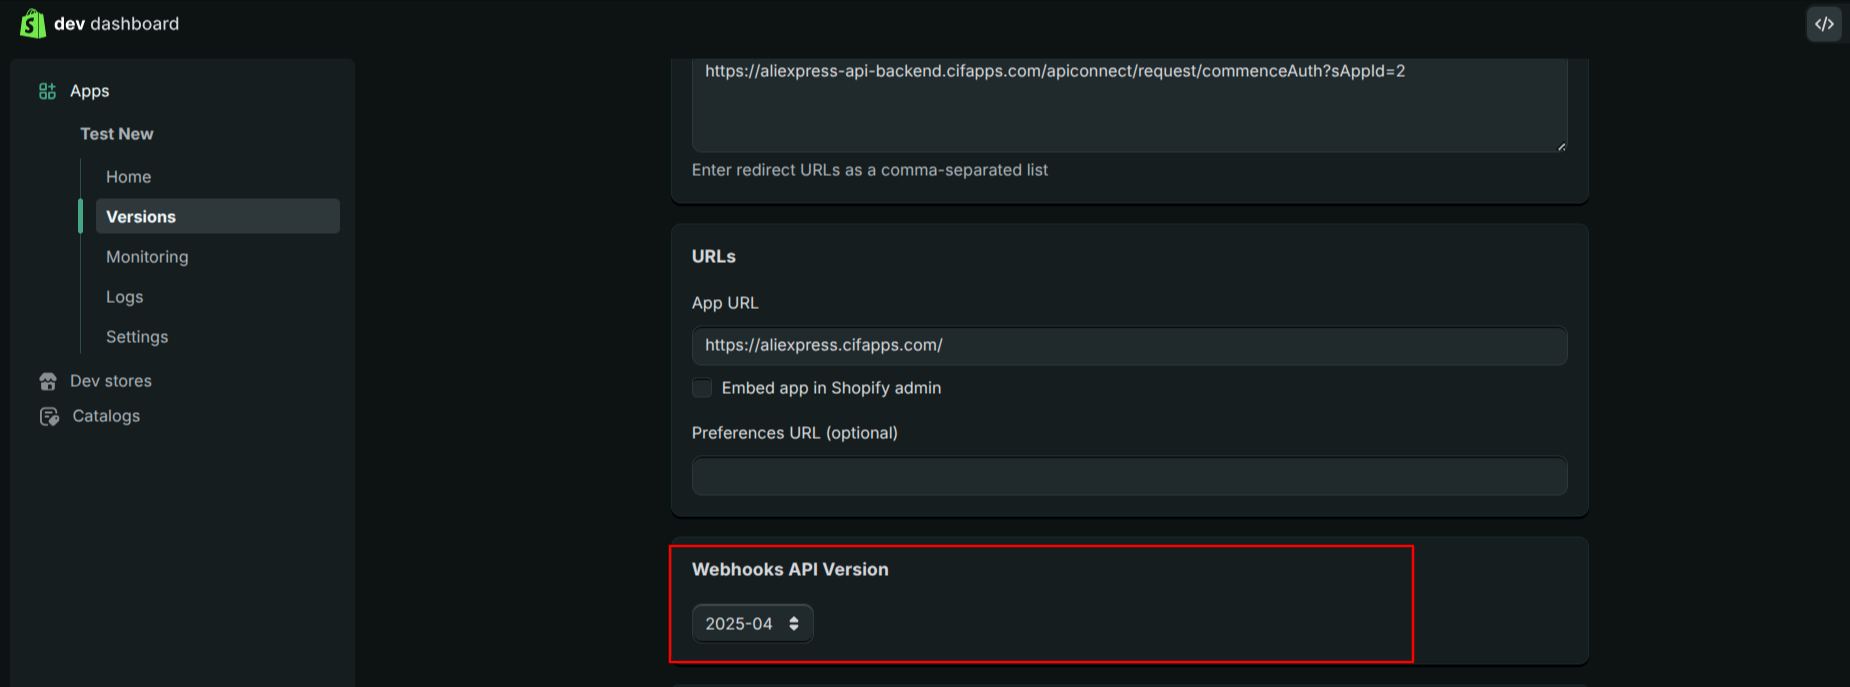
Select 2025-04 as the Webhooks API version.
Configure access scopes
Under Access → Scopes, add the following permissions exactly as listed:
read_products
read_inventory
write_orders
write_fulfillments
read_locations
write_merchant_managed_fulfillment_orders
Ensure all scopes are selected correctly before proceeding.
Enable legacy install flow and add Redirect URL
Enable Use legacy install flow.
Add the following Redirect URL:
Enable Use legacy install flow.
Add the following Redirect URL:
https://aliexpress-api-backend.cifapps.com/apiconnect/request/commenceAuth?sAppId=2
Release the application
Click Release to activate the app.
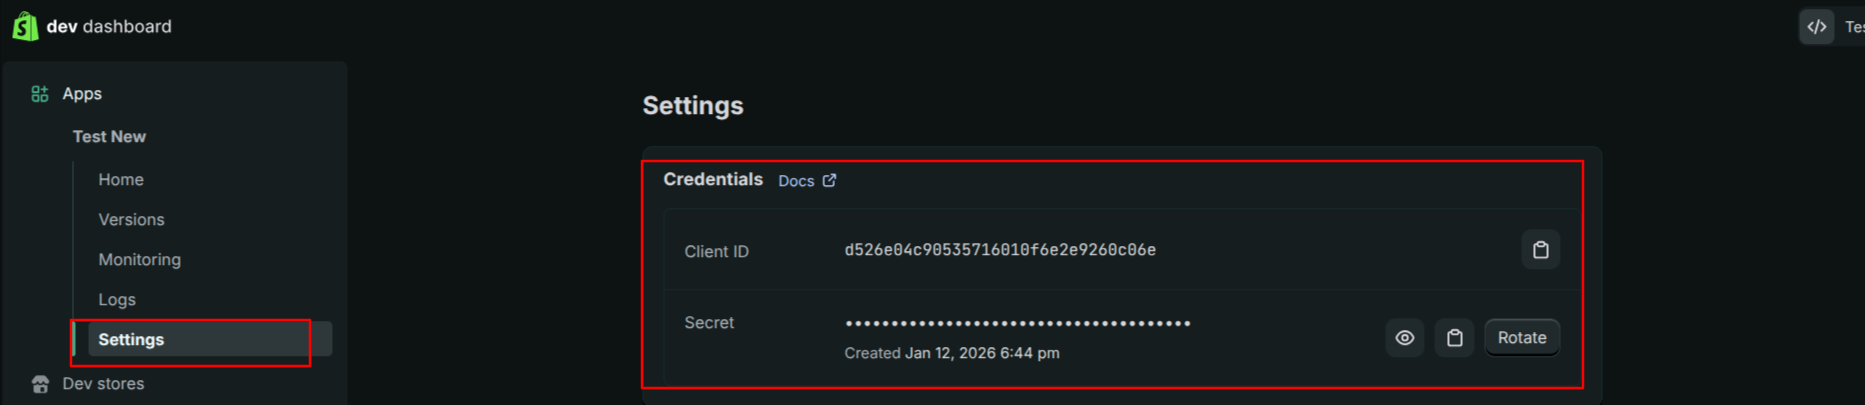
Go to Settings inside the app.
Copy the Client ID and Client Secret.
Save these credentials securely. You will need them in the next step.
Click Release to activate the app.
Go to Settings inside the app.
Copy the Client ID and Client Secret.
Save these credentials securely. You will need them in the next step.
Register on the CedCommerce AliExpress app
Open the CedCommerce AliExpress app registration page.
Click Register.
Enter the required details:
Platform: Shopify
First name
Last name
Username
Email address
Password
Click Register.
 After successful registration, a verification email will be sent to your registered email address.
Open the CedCommerce AliExpress app registration page.
Click Register.
Enter the required details:
Platform: Shopify
First name
Last name
Username
Email address
Password
Click Register.
Verify and log in
Open the verification email.
Verify your account.
Log in using your registered email/username and password.
Open the verification email.
Verify your account.
Log in using your registered email/username and password.
Step 2: Connect your Shopify account
Enter the following details:
Client ID
Client Secret
Shop URL
Then, click the save button and our Shopify application will connect successfully.
Now, you can click on the Install button in Shopify to connect your account
 Important notes
- Keep your Client ID and Client Secret secure.
If these credentials are lost, you may need to recreate the custom app.
Ensure all URLs, scopes, and API versions are entered exactly as specified.
If these credentials are lost, you may need to recreate the custom app.
Ensure all URLs, scopes, and API versions are entered exactly as specified.
How to locate your Shopify shop URL:
Log in to your Shopify store.
Check the browser address bar.
The URL will look like: https://admin.shopify.com/store/STORENAME
Add .myshopify.com after STORENAME.
Example: If your store name is FLOWERSELL, your shop URL will be: FLOWERSELL.myshopify.com
Confirmation
After successful installation:
Your Shopify store will be connected to our app.
Product, inventory, and order sync will be enabled once you begin setup.
Your Shopify store will be connected to our app.
Product, inventory, and order sync will be enabled once you begin setup.
Step 3: Next, link your AliExpress seller account.
Click Connect on the app screen.

You’ll be redirected to the AliExpress Authorization Portal.

Enter your registered AliExpress Account Email ID and Password.
Review the permissions requested (basic member info, login/user info, membership identification).
Agree to the Authorization Terms & Agreement and click Authorize.
Note: This authorization is mandatory for enabling listing, inventory sync, and order management between Shopify and AliExpress.Step 4: Select Your Plan

Choose a subscription plan that fits your catalog size and order volume.
Basic ($39/month)
Sync up to 1,000 products
Manage 100 AliExpress orders/month
Near real-time synchronization
Auto-upload of new products
24/7 bilingual chat support
Growth ($79/month) (Most Popular)
Sync up to 2,000 products
Manage 300 orders/month
Enhanced 24/7 bilingual chat support
Premium ($99/month)
Sync up to 3,000 products
Manage 800 orders/month
Dedicated server instance for faster syncing
Warehouse management for efficient stock sync
Priority 24/7 chat + call support
Click Subscribe under your preferred plan.
Step 5: Default Profile Setup

Now configure your base product profile for AliExpress.
Select AliExpress Product Category
Choose the most relevant product category for your Shopify items.
Use the search bar to filter categories.
If you change the category later, revisit the required attributes (these may differ per category).
Map AliExpress Product Attributes
Attributes are divided into 4 groups:Required Attributes (Mandatory)
Example: Brand, package dimensions (L+W+H under 300 cm), delivery method.
These must be mapped before saving.
Product Qualification Attributes (GPSR) (EU Compliance)
Upload package/label photos, safety warnings, and manufacturer details.
Enter EU Responsible Person info, which is mandatory for selling in Europe under GPSR rules.
Variation Attributes (Optional)
Example: Color, size, or other Shopify variant options.
Only needed if your product has multiple variants.
Recommended Attributes (Optional)
Example: Hazmat details, certificates, delivery options, package contents.
Not mandatory, but improve listing quality and discoverability.
Note for EU Sellers: Ensure all GPSR fields are accurately filled to comply with EU regulations. Listings missing these details may be restricted in European marketplaces.Step 6: Default Configuration

Finalize how your Shopify product data will behave on AliExpress.
Product Settings
Threshold Inventory: Define a stock buffer (e.g., 2). When product stock falls below this limit, it is marked as Sold Out on AliExpress to prevent overselling.
Currency Conversion: Enter conversion rates (e.g., 1 INR = 1 EURO) to automatically adjust product pricing for AliExpress.
- Tip for EU Sellers: Configure conversion carefully if your Shopify store currency differs from Euro, as this directly impacts your product’s pricing and VAT handling in AliExpress EU regions.
Order Settings
Sync Order: Enable this option to automatically pull AliExpress orders into Shopify.
All synced orders will include customer details, which can be configured later for email and tax handling.
Click Save & Proceed to complete the setup. You’ll then be redirected to the main dashboard.
Onboarding Complete – Your Shopify store is now connected with AliExpress. Products, pricing, inventory, and orders are fully synced, and you’re ready to sell across global markets, including Europe, with GPSR compliance.
Related Articles
AliExpress Setup Wizard: App Onboarding
Step 1: User Registration Once you have successfully installed the AliExpress Connector for Magento, the setup wizard will guide you through the onboarding process. Navigate to AliExpress Setup Wizard in your Magento Admin Panel. In the User ...Onboarding Steps of the WooCommerce AliExpress Integration
Onboarding – WooCommerce AliExpress Integration Step 1: Connect to the AliExpress Marketplace Go to CedCommerce → AliExpress in your WordPress dashboard. Under Active Marketplaces, you’ll see the AliExpress card. Click the AliExpress icon to start ...Overview of the AliExpress Integration App
AliExpress Integration App: Expand Your PrestaShop Store to Millions of Global Shoppers AliExpress receives several hundred million visits each month—approximately 20–25 million per day—and sells to customers across several countries. With its ...Steps to Install the PrestaShop AliExpress Connector Module
How to Install the PrestaShop AliExpress Connector Module Before using the AliExpress Connector, you must install it on your PrestaShop store. This process only takes a few minutes but is crucial for enabling the integration. Step-by-Step ...Overview of the AliExpress Magento Connector
About AliExpress Marketplace Owned by Alibaba Group, AliExpress is one of the world’s largest online marketplaces, connecting millions of global buyers with sellers, brands, and distributors. With a presence in countries across the world, AliExpress ...