How to bulk update Shopify products from the app
Use Bulk Update when you need to change product details — titles, inventory, price, barcode, or SKU — for many products at once. You export the products you want to edit as a CSV, make your changes in a spreadsheet, and import the same file back. Updates apply to the app and are pushed to your Shopify store.

Before you start
- Your Shopify products must already be imported into the app. If they aren't, run an import first.
- Always edit the file you exported from the app — don't build a CSV by hand. The app matches rows back to products using identifiers in the exported file.
- Keep one round-trip per change set: export, edit, import. Don't reuse an old export from a previous session.
Step 1 — Open the Bulk Update dialog
- Go to the Product Listing page.
- Click Bulk Updates. The Bulk Update dialog opens with two tabs: Export Products and Import Products.
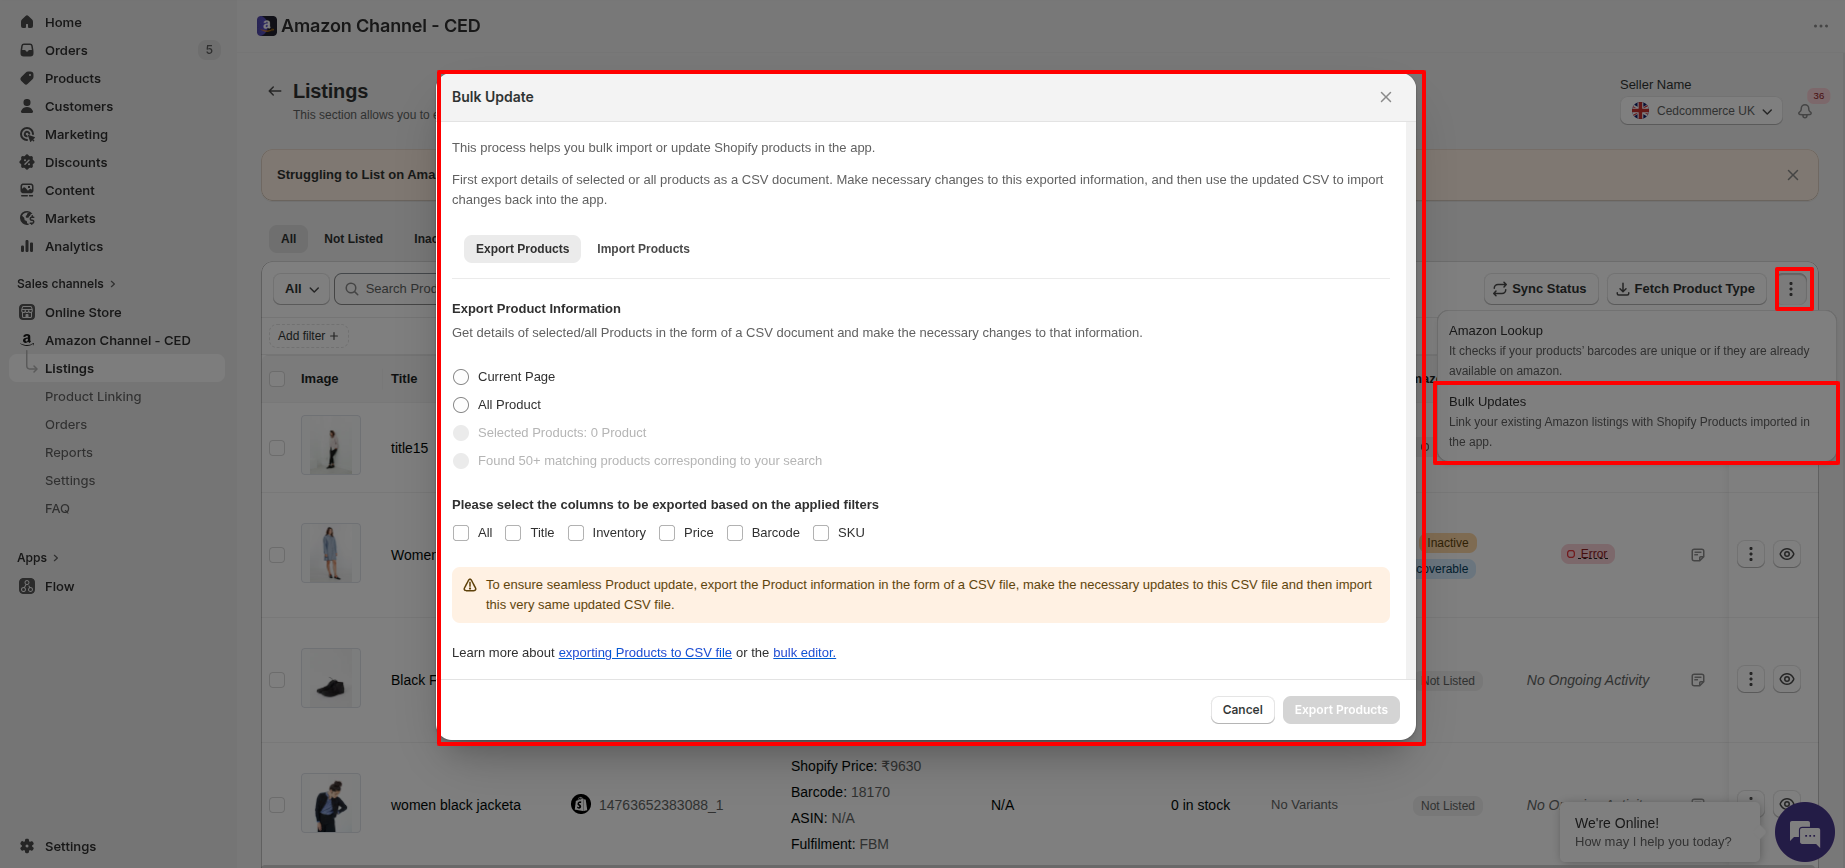
Step 2 — Export your product data to a CSV
On the Export Products tab:
Choose which products to export. Pick one of:
- Current Page — products visible on the page you are on.
- All Product — every imported product.
- Selected Products — only the rows you ticked before opening the dialog. Select the rows first if you want to use this option.
- Matching products — products that match the filters you currently have applied. This option is enabled only when filters are active.
Choose which columns to export. Tick All, or pick the specific fields you plan to edit: Title, Inventory, Price, Barcode, SKU. Exporting only the columns you need keeps the CSV small and the import faster.
Click Export Products to download the CSV.
If a file with the same name already exists, the dialog warns you and asks whether to Replace it. Choose Replace to overwrite the previous export, or cancel and rename the earlier file before exporting again.
Step 3 — Edit the CSV
- Open the downloaded CSV in a spreadsheet application (Google Sheets, Excel, Numbers).
- Update only the cells you want to change. Leave the identifier columns (such as product/variant IDs) untouched — those are used to match rows back to products.
- Save the file in CSV format. Don't convert it to XLSX — the importer expects CSV.
Step 4 — Import the updated CSV
- Open Bulk Updates again from the Product Listing page and switch to the Import Products tab.
- Drag the edited CSV into the upload area, or click to browse and select it.
- Click Import Products to start the update.
Step 5 — Track the import
Imports run in the background. Open the Recent Activities panel to watch progress and confirm the run finished successfully. Each row there shows the file name, the number of products processed, and any errors the importer flagged.
Tips
- Filter before you export to keep the CSV focused. Combined with the Matching products scope, this is the fastest way to update a specific subset.
- Test on a few products first. If you're updating hundreds of rows, export and import a small batch first so you can confirm your spreadsheet edits map to the columns you intended.
- Keep the header row intact. Renaming or removing columns will cause rows to be skipped during import.
Related Articles
Bulk-link Amazon Products to Shopify Products using a CSV
When your Amazon SKU or barcode is different from the Shopify SKU/barcode, Sync Status cannot auto-link those Amazon Products. Linking them one by one with the Link button works, but it's slow when you have hundreds of products. Instead, you can ...Export your unlinked Amazon Products as a CSV
If you want to work with your Amazon Products outside the app — for example, to match them with Shopify products in a spreadsheet and then bulk-link them back — the app can export your unlinked products to a CSV file. You can export either: Selected ...Import your Shopify products into the CedCommerce Amazon Channel app
Your Shopify products are imported into the app automatically. You just need to include the Amazon Channel - CED sales channel on the products you want to sell on Amazon. No CSV upload, no manual sync. You can do this for a single product or in bulk. ...Getting Started with CedCommerce Amazon Channel
Welcome to the CedCommerce Amazon Channel App! Effortlessly manage your Amazon business from Shopify with a single, integrated solution. The CedCommerce Amazon Channel App allows sellers to connect multiple Amazon Seller Accounts in one place, ...Onboarding the CedCommerce Amazon Channel
Onboarding Welcome to the CedCommerce Amazon Channel App onboarding process! This guide will help you install the app in your Shopify store and integrate it with your Amazon account. To ensure a successful start, have the following prerequisites ...